.webp)


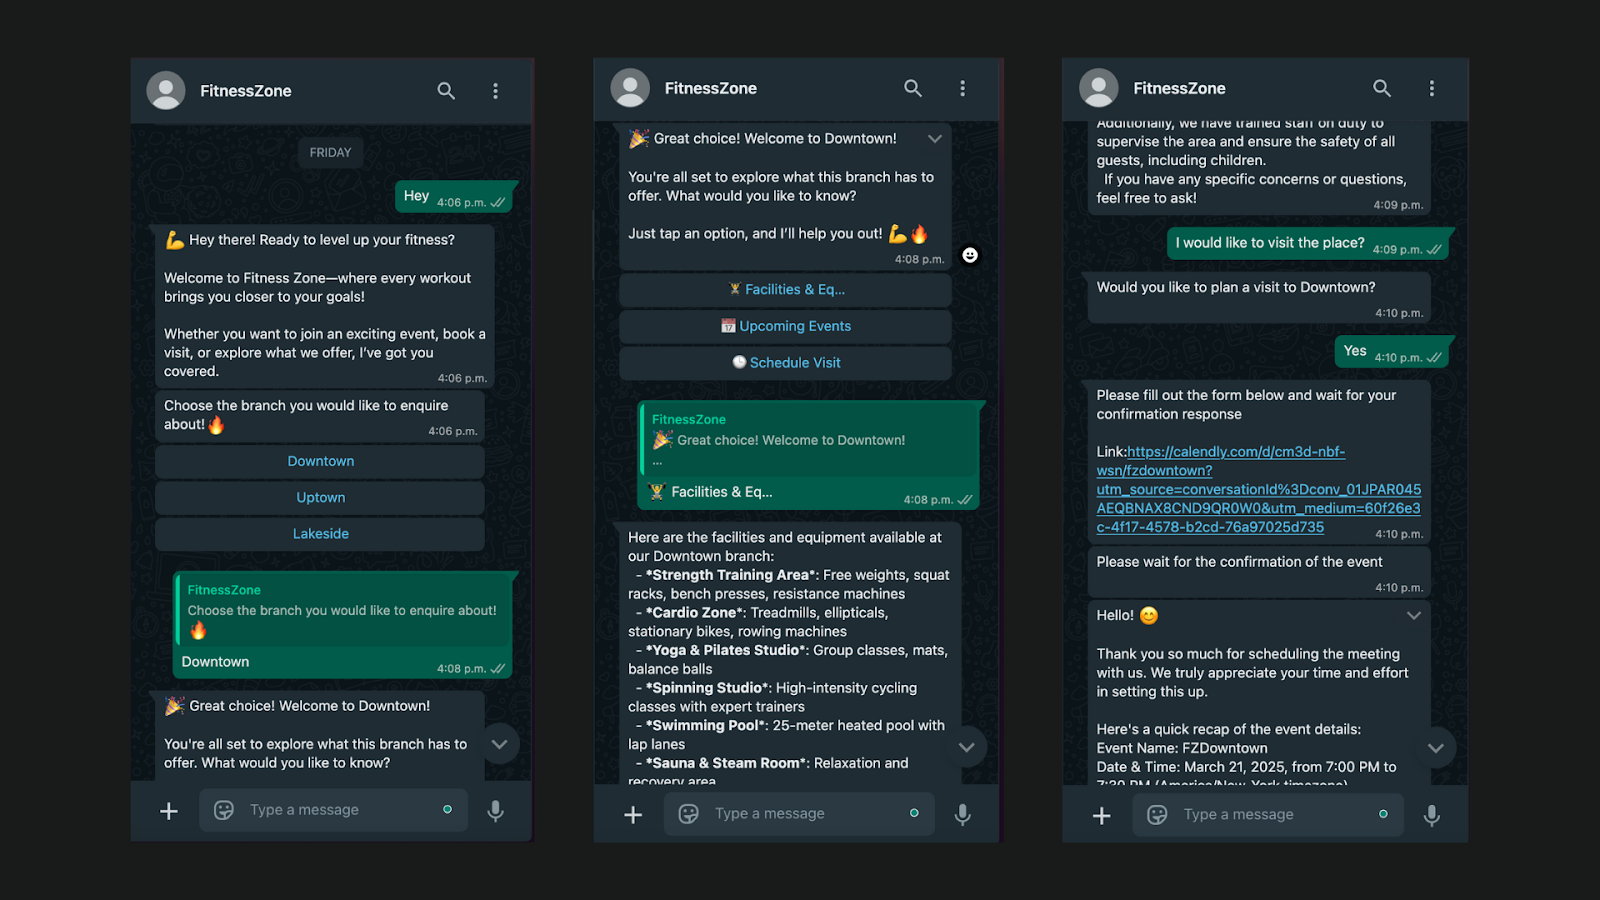
- Các chatbot đặt lịch hẹn giúp mọi người lên lịch hẹn trong khi cũng trả lời các câu hỏi thực tế trong các ứng dụng trò chuyện như WhatsApp .
- Chatbot đặt phòng AI thu hút khách hàng vào cuộc trò chuyện tự nhiên và xử lý việc theo dõi mà không gây quá tải cho nhân viên.
- Đối với hướng dẫn này, bạn sẽ cần một Calendly Gói tiêu chuẩn hoặc cao hơn, mặc dù bản dùng thử miễn phí 15 ngày cũng được.
- Bạn có thể xây dựng chatbot trong Botpress bằng cách xác định vai trò của nó, thêm cơ sở kiến thức và tích hợp nó với công cụ lập lịch của bạn.
Đặt lịch hẹn không chỉ là chọn thời gian — mà còn là đảm bảo khách hàng sẽ đến. Mọi người không chỉ lên lịch; họ còn hỏi về địa điểm, giá cả, chiết khấu, giờ làm việc và liệu chuyến thăm có xứng đáng với thời gian của họ hay không.
Đối với các doanh nghiệp đa chuỗi, việc xử lý các yêu cầu này ở nhiều địa điểm có thể rất khó khăn. Các cuộc gọi và email chồng chất, khách hàng bỏ cuộc và các cuộc hẹn bị mất có nghĩa là mất doanh thu.
Giải pháp? Xây dựng một chatbot AI không chỉ tự động lập lịch mà còn cung cấp câu trả lời tức thời, chính xác — ngay trên WhatsApp .
Trước khi đi sâu vào xây dựng, chúng ta hãy lùi lại một bước.
Mục tiêu của chatbot này rất đơn giản: giúp khách hàng đặt lịch hẹn một cách tự tin — và giảm bớt việc trao đổi qua lại mà nhóm của bạn phải giải quyết hàng ngày. Nhưng việc đặt lịch hẹn không chỉ là chọn một khoảng thời gian. Khách hàng muốn biết những thông tin như:
- Địa điểm nào gần nhất?
- Có chương trình giảm giá nào đang diễn ra không?
- Phòng tập mở cửa vào lúc mấy giờ vào cuối tuần?
- Tôi có thể đổi lịch nếu có việc đột xuất không?
Một bot đặt phòng tốt không chỉ xử lý việc lên lịch — nó còn trả lời những câu hỏi này nữa. Và khi bạn cung cấp tất cả những điều đó trong một WhatsApp cuộc trò chuyện, nhiều người sẽ thực hiện đặt chỗ hơn.
Để xây dựng chatbot, bạn sẽ cần:
- Calendly (Gói tiêu chuẩn) – Bắt buộc để truy cập API. Bạn có thể bắt đầu dùng thử miễn phí 14 ngày.
- Tài khoản Meta Business – Miễn phí và bắt buộc đối với WhatsApp sự tích hợp.
- Tài khoản Botpress – Miễn phí tạo và sử dụng để xây dựng và quản lý logic chatbot.
Bạn có thể thiết lập trước hoặc làm theo hướng dẫn từng bước.
Bước 1: Xác định mục đích của Bot
Trước khi mở bất kỳ công cụ nào, hãy dành một phút để phác thảo những gì bot của bạn cần làm — điều này giúp tiết kiệm thời gian sau này khi bạn kết nối Calendly , tải thông tin lên hoặc thiết lập quy trình làm việc.
Hãy tự hỏi mình:
- Đối tượng của bạn là ai? Những người lần đầu đến phòng tập thể dục? Các thành viên muốn đổi lịch tập?
- Bot có thể giúp gì? Đặt lịch hẹn, trả lời câu hỏi thường gặp , chia sẻ địa điểm?
- Nó nên xử lý loại đầu vào nào? Trả lời nhanh như "Đặt lớp học" — hay ngôn ngữ tự nhiên như "Tôi muốn đến thăm địa điểm ở trung tâm thành phố vào cuối tuần này"?
- Liệu nó có cung cấp dịch vụ chuyển giao không? Nếu ai đó bối rối, bot sẽ đưa người vào hay cố gắng hướng dẫn họ quay lại?
Phác thảo điều này ngay bây giờ sẽ giúp bạn thiết kế luồng rõ ràng hơn — và tránh phải xây dựng lại khi bạn bắt đầu phân lớp cơ sở kiến thức hoặc kích hoạt logic.
Mẹo chuyên nghiệp: Bắt đầu từ quy mô nhỏ. Một bot đặt phòng tại một địa điểm có thể trả lời 5–10 câu hỏi chính sẽ có giá trị hơn nhiều (và có thể triển khai) so với một bot được thiết kế quá mức cố gắng làm mọi thứ.
Bước 2: Thêm Cơ sở kiến thức
Cơ sở kiến thức là tập hợp thông tin mà chatbot của bạn có thể sử dụng để trả lời các câu hỏi — giống như thư viện tham khảo cho doanh nghiệp của bạn.
Thay vì mã hóa cứng mọi phản hồi, bạn có thể tải lên các tài liệu hoặc bảng mà bot có thể tìm kiếm khi người dùng hỏi về những thông tin như giá cả, dịch vụ hoặc giờ hoạt động.
Bạn có thể coi nó như nội dung cung cấp năng lượng cho bộ não của chatbot.
Tải lên thông tin kinh doanh tĩnh
Bắt đầu bằng cách tải lên một tài liệu đơn giản, có cấu trúc bao gồm những câu hỏi thường gặp nhất của khách hàng. Đây có thể là PDF, tài liệu Word hoặc bảng tính — chỉ cần đảm bảo rằng nó được sắp xếp rõ ràng.
Tài liệu của bạn phải bao gồm:
- Địa điểm và địa chỉ chi nhánh
- Các dịch vụ có sẵn tại mỗi địa điểm
- Giá cả, chiết khấu và tùy chọn thành viên
- Giờ làm việc và thông tin liên lạc
Mỗi chủ đề phải có mục rõ ràng để chatbot có thể dễ dàng tìm và trả về câu trả lời có liên quan.
Mẹo: Sử dụng tiêu đề và dấu đầu dòng trong tài liệu để cả bot và nhóm của bạn đều có thể dễ dàng nắm bắt.
Bạn có thể tải tài liệu này lên bằng cách vào phần Cơ sở kiến thức :
- Từ dự án của bạn, hãy mở menu bên trái.
- Nhấp vào Cơ sở kiến thức .
- Chọn Tải tài liệu lên và thêm tệp của bạn.
Đặt tên rõ ràng cho tài liệu (ví dụ: Chi tiết chi nhánh – Tháng 3 năm 2025 ) để bạn có thể tham chiếu sau này trong quy trình làm việc hoặc truy vấn.
Sau khi tải lên, chatbot có thể ngay lập tức bắt đầu sử dụng tài liệu để trả lời câu hỏi của người dùng — không cần đào tạo hoặc lập trình thêm.
.webp)
Sử dụng bảng cho thông tin động
Đối với những thứ như sự kiện sắp tới, ưu đãi theo mùa hoặc lịch trình luân phiên, tốt hơn là sử dụng bảng thay vì tải lên tài liệu tĩnh. Bảng cho phép bạn cập nhật chỉ một hàng mà không cần chạm vào phần còn lại của dữ liệu — giúp bảo trì nhanh hơn.
Sau đây là cách tạo bảng trong cơ sở kiến thức của bạn:
- Vào phần Cơ sở kiến thức từ menu bên trái.
- Nhấp vào Tạo mới, sau đó chọn Bảng .
- Đặt tên cho bảng của bạn (ví dụ: Lịch trình sự kiện ).
- Thêm các cột cho loại thông tin bạn muốn chatbot thu thập, như:
- tên_sự_kiện
- ngày
- vị trí
- giá
- Sự miêu tả
- Bắt đầu thêm hàng cho mỗi sự kiện hoặc mục mà bạn muốn bot tham chiếu.
Sau khi lưu bảng, bạn có thể sử dụng bảng để cung cấp phản hồi động. Ví dụ, khi người dùng hỏi "Sự kiện nào sẽ diễn ra vào cuối tuần tới?", bot có thể kéo hàng có liên quan và cung cấp cho họ câu trả lời trực tiếp.
.webp)
Tối ưu hóa chi phí với Câu hỏi thường gặp được lưu trong bộ nhớ đệm
Một trong những thách thức lớn nhất với các bot hỗ trợ AI là chi phí — đặc biệt là nếu bot đạt đến LLM mỗi khi có ai đó hỏi một câu hỏi phổ biến.
Cơ sở kiến thức giúp giảm thiểu điều này bằng cách tự động lưu trữ các câu trả lời cho những câu hỏi thường gặp. Điều đó có nghĩa là nếu năm người hỏi "Lịch trình cuối tuần của phòng tập thể dục là gì?", nền tảng chỉ truy vấn cơ sở kiến thức của bạn hoặc LLM một lần — sau đó sử dụng lại câu trả lời đó ngay lập tức vào lần tiếp theo.
Bạn không cần phải cấu hình bất cứ thứ gì. Bộ nhớ đệm sẽ tự động hoạt động nếu:
- Câu trả lời đến từ nội dung có cấu trúc (tài liệu, bảng hoặc Câu hỏi thường gặp)
- Bot được kết nối với một LLM hoặc đường ống RAG
- Người dùng vẫn ở trong cùng một chủ đề
Điều này giúp bot của bạn hoạt động nhanh — và cắt giảm lượng mã thông báo sử dụng mà không ảnh hưởng đến trải nghiệm.
Bước 3: Thêm Calendly Tích hợp
Để cho phép chatbot của bạn lên lịch cuộc hẹn, bạn cần kết nối Calendly với Botpress . Điều này cho phép bot truy cập vào các khung thời gian khả dụng và tạo liên kết đặt chỗ cho người dùng.
Cài đặt Calendly tích hợp
Bắt đầu từ bảng điều khiển dự án của bạn:
- Vào Hub từ menu bên trái.
- Tìm kiếm Calendly và nhấp vào Cài đặt .
- Sau khi cài đặt, hãy mở cài đặt Tích hợp Calendly từ dự án của bạn.
Tạo và thêm của bạn Calendly Khóa API
Tiếp theo, bạn sẽ cần tạo khóa API cá nhân từ Calendly và thêm nó vào quy trình làm việc:
- Đăng nhập vào tài khoản của bạn Calendly tài khoản.
- Nhấp vào Tích hợp & Ứng dụng từ menu bên trái.
- Cuộn xuống API & Webhooks và nhấp vào Nhận mã thông báo ngay .
- Đặt tên cho mã thông báo (ví dụ: Access ) và hoàn tất xác thực hai yếu tố nếu được nhắc.
- Sao chép khóa API — bạn sẽ không thể xem lại khóa này sau.
- Quay lại Botpress và dán khóa vào cài đặt Tích hợp Calendly .
- Nhấp vào Lưu để hoàn tất kết nối.
Sau khi kết nối, chatbot của bạn sẽ có thể lấy dữ liệu về tình trạng sẵn có và tạo liên kết lên lịch dựa trên vị trí hoặc sở thích của người dùng.
Bước 4: Xây dựng quy trình làm việc của Chatbot
Bây giờ thì Calendly được kết nối, đã đến lúc xây dựng logic chatbot — hoặc cái gì đó Botpress gọi là quy trình làm việc . Đây là nơi bạn quyết định cuộc trò chuyện sẽ diễn ra như thế nào: bot sẽ nói gì, thông tin nào sẽ thu thập và cách phản hồi dựa trên lựa chọn của người dùng.
Hãy nghĩ về việc thiết lập sơ đồ cho trợ lý lễ tân. Nếu ai đó bước vào và nói, "Tôi muốn đặt một buổi tập thử tại phòng tập thể dục ở trung tâm thành phố", trợ lý sẽ:
- Hỏi vị trí nào
- Kéo lên đúng lịch trình
- Chia sẻ liên kết đến cuốn sách
- Xác nhận cuộc hẹn
- Trả lời bất kỳ câu hỏi tiếp theo
Chatbot của bạn cần phải thực hiện chính xác điều đó — nhưng trên nền tảng do bạn lựa chọn.
1. Ghi lại Lựa chọn Nhánh của Người dùng
Vì doanh nghiệp của bạn có thể có nhiều chi nhánh nên bot cần biết người dùng muốn chi nhánh nào trước khi hiển thị tình trạng còn phòng.
- Thêm một nút lựa chọn duy nhất để yêu cầu người dùng chọn một vị trí.
- Tạo một biến (ví dụ: workflow.branch) để lưu trữ lựa chọn của họ.
- Bạn sẽ sử dụng điều này sau để gửi đúng Calendly liên kết dựa trên nhánh đã chọn.
Điều này đảm bảo rằng tất cả các liên kết và phản hồi lập lịch đều được điều chỉnh theo đúng nhánh.
.webp)
2. Sử dụng Calendly Quy trình sự kiện
Các Hub cũng cung cấp một quy trình làm việc được xây dựng sẵn kết nối trực tiếp với Calendly cài đặt.
- Trong phần Quy trình công việc , hãy tìm kiếm Quy trình sự kiện Calendly .
- Nhấp vào Sao chép để tạo phiên bản có thể chỉnh sửa của bạn.
- Tùy chỉnh luồng nếu cần — luồng đã được thiết lập để tạo liên kết đặt chỗ liên kết với phiên của người dùng bằng cách sử dụng conversationId .
Bằng cách truyền ID cuộc trò chuyện, chatbot tạo ra một liên kết đặt chỗ duy nhất có thể theo dõi từng người dùng. Quy trình làm việc được xây dựng sẵn này giúp tiết kiệm thời gian và đảm bảo logic lập lịch của bạn đã được kết nối chính xác.
.webp)
3. Thiết lập Calendly Sự kiện kích hoạt
Sau khi gửi liên kết đặt chỗ, bạn muốn chatbot phát hiện thời điểm người dùng đã lên lịch cuộc hẹn.
- Nhấp chuột phải vào bên trong quy trình làm việc và thêm nút Kích hoạt sự kiện Calendly .
- In the settings, pass the conversation ID using:
{{event.payload.conversation.id}} - Điều này cho phép chatbot lắng nghe thông tin đặt chỗ cụ thể của người dùng.
- Khi được kích hoạt, bot có thể tự động gửi tin nhắn xác nhận.
Điều này khiến bot trở nên thông minh và phản hồi nhanh — đồng thời đảm bảo người dùng biết cuộc hẹn của họ đã được đặt.
4. Xử lý thông tin kinh doanh và câu hỏi thường gặp
Không phải ai cũng sẽ nhảy thẳng vào đặt chỗ. Một số người dùng có thể hỏi về giá cả, giờ làm việc hoặc dịch vụ trước. Bạn có thể xử lý việc này bằng cách kết nối cơ sở kiến thức của mình.
- Thêm một nút tự động được liên kết với cơ sở kiến thức.
- Bật tìm kiếm kiến thức để bot có thể lấy phản hồi từ các tài liệu hoặc bảng đã tải lên.
- Sử dụng nút này như một giải pháp dự phòng khi người dùng đặt câu hỏi chung.
Bằng cách này, bot của bạn vẫn hữu ích — ngay cả với những người dùng chưa sẵn sàng đặt chỗ.
.webp)
Bước 5: Triển khai Chatbot
Với chatbot được xây dựng hoàn chỉnh, bước cuối cùng là triển khai nó trên kênh bạn chọn. Đối với ví dụ này, chúng tôi sẽ chọn WhatsApp để người dùng có thể tương tác trực tiếp. Điều này cho phép lên lịch hẹn liền mạch và phản hồi ngay lập tức cho các câu hỏi thường gặp — tất cả đều trong một ứng dụng nhắn tin quen thuộc.
Sau đây là cách kết nối chatbot của bạn với WhatsApp :
- Vào Trang chủ từ menu bên trái.
- Nhấp vào Ủy quyền WhatsApp và kết nối nó với Tài khoản Meta Business của bạn.
- Làm theo các bước trên màn hình để hoàn tất thiết lập.
Sau khi kết nối, chatbot của bạn sẽ hoạt động trực tiếp trên WhatsApp — sẵn sàng xử lý các cuộc trò chuyện thực tế với khách hàng của bạn.
Triển khai Chatbot Đặt phòng vào Tuần tới
Các doanh nghiệp trong nhiều ngành đang sử dụng chatbot đặt phòng để hợp lý hóa việc đặt chỗ, giảm lỗi và cung cấp dịch vụ khách hàng 24/7, đồng thời cải thiện hiệu quả hoạt động.
Botpress là nền tảng cấp doanh nghiệp để xây dựng các chatbot đặt phòng an toàn, có khả năng mở rộng, phù hợp với nhu cầu của bạn.
Với sự tích hợp liền mạch, các công cụ dành riêng cho nhà phát triển và các tính năng tùy chỉnh nâng cao, bạn có thể tự động hóa quy trình đặt chỗ và mang đến trải nghiệm hoàn hảo cho khách hàng.
Bắt đầu xây dựng ngay hôm nay. Nó miễn phí.
Câu hỏi thường gặp
1. Loại hình doanh nghiệp nào được hưởng lợi nhiều nhất từ chatbot đặt lịch hẹn?
Các doanh nghiệp thường xuyên lên lịch hẹn – như phòng khám, trung tâm thể hình, thẩm mỹ viện, dịch vụ ô tô, hoạt động pháp lý và chuỗi dịch vụ đa địa điểm – được hưởng lợi nhiều nhất từ chatbot đặt lịch hẹn.
2. Chatbot cải thiện tỷ lệ khách hàng đến hẹn như thế nào?
Chatbot cải thiện tỷ lệ khách hàng đến bằng cách tự động gửi tin nhắn xác nhận và cập nhật vào phút chót hoặc tùy chọn lên lịch lại, giúp giảm tình trạng quên.
3. Chatbot này khác gì so với các biểu mẫu đặt phòng truyền thống?
So với các biểu mẫu đặt phòng truyền thống, chatbot cung cấp trải nghiệm tương tác, trò chuyện, hướng dẫn người dùng theo thời gian thực và cá nhân hóa việc đặt phòng, giảm tỷ lệ hủy đơn và cải thiện sự hài lòng của người dùng.
4. Giải pháp này có khả năng mở rộng đến mức nào đối với một doanh nghiệp có hàng chục chi nhánh?
Các chatbot đặt lịch hẹn có khả năng mở rộng cao; chúng có thể sử dụng logic dựa trên vị trí hoặc API để cung cấp các tùy chọn được cá nhân hóa dựa trên thông tin đầu vào của người dùng, giúp chúng có khả năng quản lý việc đặt lịch hẹn trên hàng trăm chi nhánh mà không cần thiết lập thêm.
5. Những hạn chế chính của chatbot đặt lịch hẹn là gì?
Những hạn chế chính của chatbot đặt lịch hẹn bao gồm khả năng giải quyết vấn đề hạn chế nếu tích hợp lịch hoặc CRM không thành công và cần đào tạo liên tục để duy trì tính chính xác và hữu ích trong mọi tình huống.


%20(1).webp)

