.webp)


- Ang mga chatbot sa pag-book ay tumutulong sa mga tao na mag-iskedyul ng mga appointment habang sinasagot din ang mga praktikal na tanong sa lahat ng nasa loob ng mga chat app tulad WhatsApp .
- Ang AI booking chatbot ay nakikipag-ugnayan sa mga customer sa natural na pag-uusap at pinangangasiwaan ang mga follow-up nang hindi nagpapabigat sa staff.
- Para sa tutorial na ito, kakailanganin mo ng isang Calendly Karaniwan o mas mataas na plano, kahit na ang 15-araw na libreng pagsubok ay gumagana din.
- Maaari kang bumuo ng chatbot sa Botpress sa pamamagitan ng pagtukoy sa tungkulin nito, pagdaragdag ng base ng kaalaman, at pagsasama nito sa iyong tool sa pag-iiskedyul.
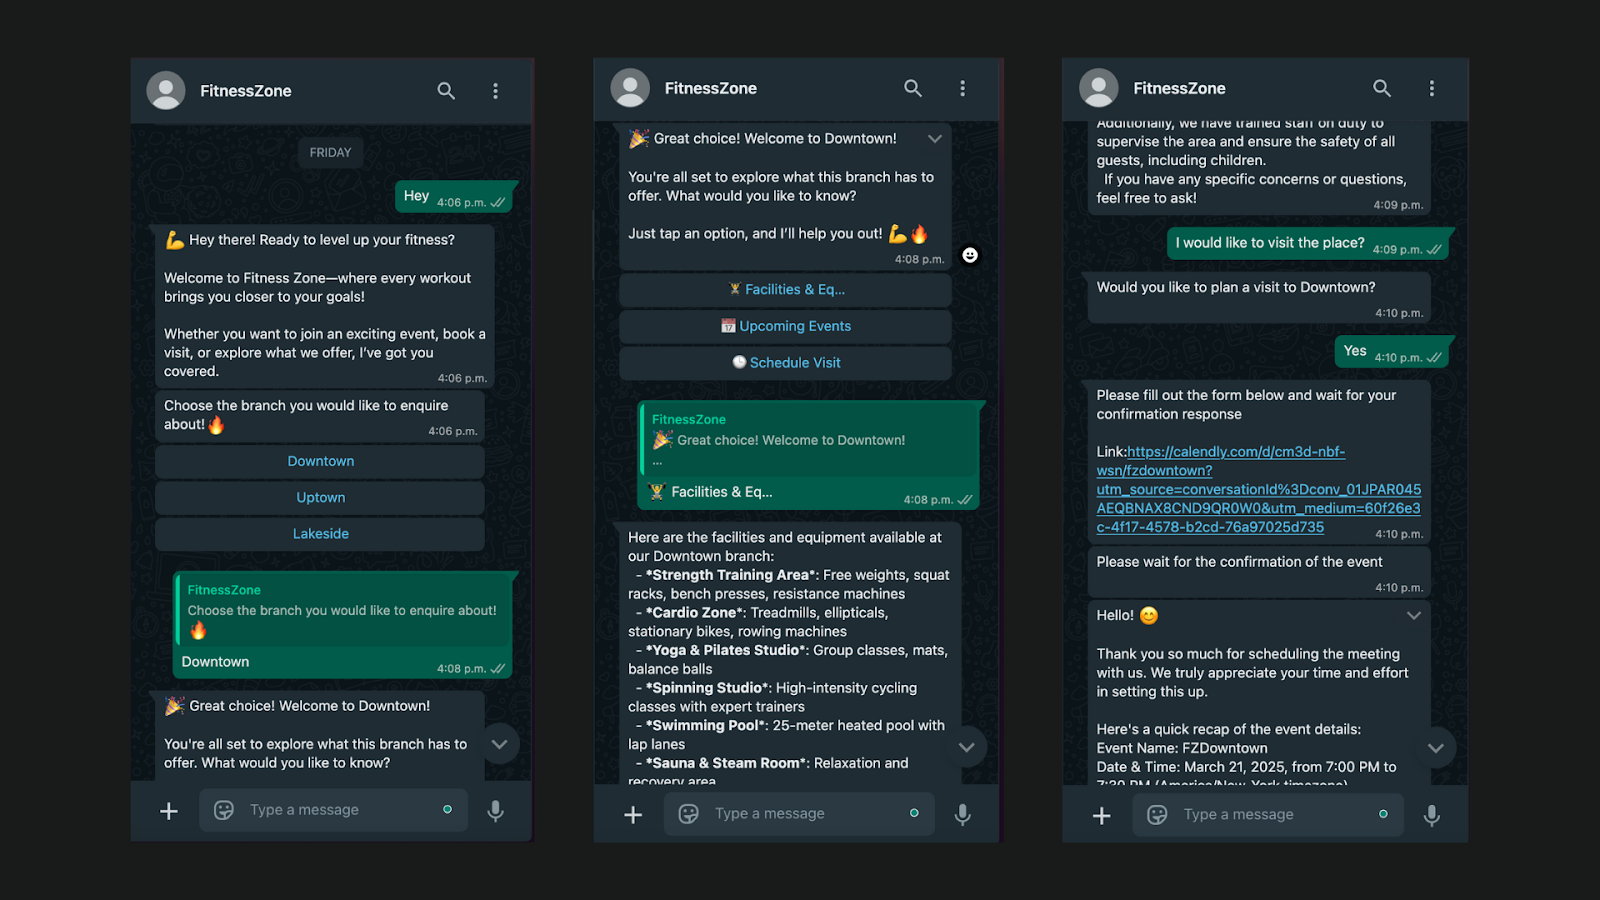
Ang pag-book ng appointment ay hindi lang tungkol sa pagpili ng time slot — ito ay tungkol sa pagtiyak na lalabas ang customer. Ang mga tao ay hindi lamang nag-iskedyul; nagtatanong sila tungkol sa mga lokasyon, pagpepresyo, mga diskwento, oras ng negosyo, at kung sulit ang pagbisita sa kanilang oras.
Para sa mga multi-chain na negosyo, ang paghawak sa mga katanungang ito sa maraming lokasyon ay maaaring maging napakalaki. Tumataas ang mga tawag at email, bumababa ang mga customer, at ang mga nawalang appointment ay nangangahulugan ng pagkawala ng kita.
Ang solusyon? Bumuo ng AI chatbot na hindi lamang nag-o-automate ng pag-iiskedyul ngunit nagbibigay din ng madalian, tumpak na mga sagot — sa mismong paraan WhatsApp .
Bago tayo sumisid sa gusali, tumalikod tayo.
Ang layunin ng chatbot na ito ay simple: tulungan ang mga customer na mag-book ng mga appointment nang may kumpiyansa — at bawasan ang pabalik-balik na pakikitungo ng iyong team araw-araw. Ngunit ang appointment booking ay hindi lamang tungkol sa pagpili ng time slot. Gustong malaman ng mga customer ang mga bagay tulad ng:
- Aling lokasyon ang pinakamalapit?
- Mayroon bang anumang mga diskwento na tumatakbo?
- Anong oras nagbubukas ang gym kapag weekend?
- Maaari ba akong mag-reschedule kung may dumating?
Ang isang mahusay na bot sa pag-book ay hindi lamang humahawak sa pag-iiskedyul - sinasagot din nito ang mga tanong na ito. At kapag inihatid mo lahat ng iyon sa isang solong WhatsApp pag-uusap, mas maraming tao ang sumusunod sa kanilang mga booking.
Upang bumuo ng iyong chatbot, kakailanganin mo:
- Calendly (Standard Plan) – Kinakailangan para sa API access. Maaari kang magsimula sa 14 na araw na libreng pagsubok.
- Meta Business Account – Libre at kinakailangan para sa WhatsApp pagsasama.
- Botpress Account – Libreng lumikha at magamit para sa pagbuo at pamamahala ng chatbot logic.
Maaari mong i-set up ang mga ito bago pa man — o sundin kasama ang gabay na hakbang-hakbang.
Hakbang 1: Tukuyin ang Layunin ng Bot
Bago buksan ang anumang tool, maglaan ng isang minuto upang i-sketch kung ano ang kailangang gawin ng iyong bot — nakakatipid ito ng oras sa ibang pagkakataon kapag kumokonekta ka Calendly , pag-upload ng impormasyon, o mga wiring workflow.
Tanungin ang iyong sarili:
- Sino ang iyong madla? Unang beses na bisita sa gym? Mga miyembrong gustong mag-reschedule?
- Ano ang dapat tulungan ng bot? Mga appointment sa pag-book, pagsagot sa mga FAQ , pagbabahagi ng mga lokasyon?
- Anong uri ng mga input ang dapat nitong pangasiwaan? Mabilis na tugon tulad ng “Mag-book ng klase” — o natural na wika tulad ng “Gusto kong bisitahin ang lokasyon sa downtown ngayong weekend”?
- Dapat ba itong mag-alok ng handoff? Kung may nalilito, magdadala ba ang bot ng tao o susubukang gabayan sila pabalik?
Ang pag-sketch nito ngayon ay nakakatulong sa iyo na magdisenyo ng mas malinis na mga daloy — at maiwasan ang mga muling pagtatayo kapag nagsimula kang mag-layer sa mga base ng kaalaman o mga trigger ng logic.
Pro tip: Magsimula sa maliit. Ang isang bot sa pag-book ng solong lokasyon na sumasagot sa 5–10 pangunahing tanong ay mas mahalaga (at mailulunsad) kaysa sa isang bot na sobrang inengineer na sumusubok na gawin ang lahat.
Hakbang 2: Magdagdag ng Knowledge Base
Ang knowledge base ay isang koleksyon ng impormasyon na magagamit ng iyong chatbot upang sagutin ang mga tanong — tulad ng isang reference na library para sa iyong negosyo.
Sa halip na i-hardcode ang bawat tugon, maaari kang mag-upload ng mga dokumento o talahanayan na maaaring hanapin ng bot kapag nagtanong ang mga user tungkol sa mga bagay tulad ng pagpepresyo, mga serbisyo, o oras ng pagpapatakbo.
Maaari mong isipin ito bilang ang nilalaman na nagpapagana sa utak ng iyong chatbot.
Mag-upload ng static na impormasyon ng negosyo
Magsimula sa pamamagitan ng pag-upload ng simple at structured na dokumento na sumasaklaw sa mga pinakakaraniwang tanong ng mga customer. Ito ay maaaring isang PDF, Word doc, o spreadsheet — siguraduhin lang na ito ay malinaw na nakaayos.
Dapat kasama sa iyong dokumento ang:
- Mga lokasyon at address ng sangay
- Available ang mga serbisyo sa bawat lokasyon
- Pagpepresyo, mga diskwento, at mga opsyon sa membership
- Mga oras ng pagpapatakbo at mga detalye ng contact
Ang bawat paksa ay dapat magkaroon ng malinaw na seksyon nito, para madaling mahanap at maibalik ng chatbot ang mga nauugnay na sagot.
Tip: Gumamit ng mga header at bullet point sa iyong dokumento para panatilihing na-scan ang mga bagay para sa bot at sa iyong team.
Maaari mong i-upload ang dokumentong ito sa pamamagitan ng pagpunta sa seksyon ng Knowledge Base :
- Mula sa iyong proyekto, buksan ang kaliwang menu.
- I-click ang Knowledge Base .
- Piliin ang Mag-upload ng dokumento at idagdag ang iyong file.
Bigyan ng malinaw na pangalan ang dokumento (hal., Mga Detalye ng Sangay – Marso 2025 ) para ma-reference mo ito sa ibang pagkakataon sa mga workflow o query.
Kapag na-upload na, maaaring agad na simulan ng chatbot ang paggamit ng dokumento upang sagutin ang mga tanong ng user — walang karagdagang pagsasanay o coding ang kailangan.
.webp)
Paggamit ng mga talahanayan para sa dynamic na impormasyon
Para sa mga bagay tulad ng mga paparating na kaganapan, pana-panahong alok, o umiikot na mga iskedyul, mas mainam na gumamit ng talahanayan sa halip na mag-upload ng static na dokumento. Hinahayaan ka ng mga talahanayan na mag-update ng isang row lang nang hindi hinahawakan ang natitirang bahagi ng iyong data — na ginagawang mas mabilis ang pagpapanatili.
Narito kung paano gumawa ng talahanayan sa iyong base ng kaalaman:
- Pumunta sa seksyong Knowledge Base mula sa kaliwang menu.
- I-click ang Gumawa ng Bago, pagkatapos ay piliin ang Talahanayan .
- Pangalanan ang iyong talahanayan (hal., Iskedyul ng Kaganapan ).
- Magdagdag ng mga column para sa mga uri ng impormasyon na gusto mong makuha ng chatbot, tulad ng:
- event_name
- petsa
- lokasyon
- presyo
- paglalarawan
- Magsimulang magdagdag ng mga row para sa bawat event o item na gusto mong i-reference ng bot.
Kapag na-save na ang iyong talahanayan, maaari mo itong gamitin para paganahin ang mga dynamic na tugon. Halimbawa, kapag nagtanong ang isang user, "Anong mga kaganapan ang nangyayari sa susunod na katapusan ng linggo?", maaaring hilahin ng bot ang nauugnay na row at bigyan sila ng direktang sagot.
.webp)
Pag-optimize ng mga gastos gamit ang mga naka-cache na FAQ
Isa sa mga pinakamalaking hamon sa mga bot na pinapagana ng AI ay ang gastos — lalo na kung ang bot ay tumama sa LLM tuwing may nagtatanong ng karaniwang tanong.
Nakakatulong ang knowledge base na bawasan ito sa pamamagitan ng awtomatikong pag-cache ng mga sagot sa mga madalas itanong. Nangangahulugan iyon kung ang limang tao ay magtanong, "Ano ang iskedyul ng katapusan ng linggo ng gym?", itatanong lang ng platform ang iyong base ng kaalaman o LLM isang beses — pagkatapos ay muling gagamitin ang sagot na iyon kaagad sa susunod na pagkakataon.
Hindi mo kailangang i-configure ang anuman. Awtomatikong papasok ang pag-cache kung:
- Ang sagot ay mula sa structured content (isang dokumento, talahanayan, o FAQ)
- Ang bot ay konektado sa isang LLM o RAG pipeline
- Nananatili ang user sa parehong thread ng paksa
Pinapanatili nitong mabilis ang iyong bot — at binabawasan ang paggamit ng token nang hindi nakompromiso ang karanasan.
Hakbang 3: Magdagdag Calendly Pagsasama
Upang paganahin ang iyong chatbot na mag-iskedyul ng mga appointment, kailangan mong kumonekta Calendly kasama Botpress . Nagbibigay-daan ito sa bot na ma-access ang mga available na time slot at bumuo ng mga link sa pag-book para sa mga user.
I-install ang Calendly pagsasama
Magsimula sa dashboard ng iyong proyekto:
- Pumunta sa Hub mula sa kaliwang menu.
- Maghanap para sa Calendly at i-click ang I-install .
- Kapag na-install na, buksan ang mga setting ng Calendly Integration mula sa iyong proyekto.
Bumuo at idagdag ang iyong Calendly API key
Susunod, kakailanganin mong bumuo ng personal na API key mula sa Calendly at idagdag ito sa workflow:
- Mag-log in sa iyong Calendly account.
- I-click ang Mga Pagsasama at Apps mula sa kaliwang menu.
- Mag-scroll pababa sa API at Webhooks at i-click ang Kumuha ng token ngayon .
- Pangalanan ang token (hal., Access ) at kumpletuhin ang two-factor authentication kung sinenyasan.
- Kopyahin ang API key — hindi mo na ito makikitang muli sa ibang pagkakataon.
- Bumalik sa Botpress at i-paste ang key sa mga setting ng Calendly Integration .
- I-click ang I-save upang tapusin ang koneksyon.
Kapag nakakonekta na, magagawa ng iyong chatbot na kumuha ng data ng availability at makabuo ng mga link sa pag-iiskedyul batay sa lokasyon o mga kagustuhan ng user.
Hakbang 4: Bumuo ng Chatbot Workflow
Ngayon na Calendly ay konektado, oras na para buuin ang logic ng chatbot — o ano Botpress tinatawag na workflow . Dito ka magpapasya kung paano mapupunta ang pag-uusap: kung ano ang dapat sabihin ng bot, anong impormasyon ang dapat nitong kolektahin, at kung paano ito dapat tumugon batay sa mga pagpipilian ng user.
Isipin ito bilang pag-set up ng flowchart para sa isang front desk assistant. Kung may pumasok at nagsabing, "Gusto kong mag-book ng trial session sa downtown gym," gagawin ng assistant ang:
- Itanong kung saang lokasyon
- Hilahin ang tamang iskedyul
- Magbahagi ng link para mag-book
- Kumpirmahin ang appointment
- Sagutin ang anumang mga follow-up na tanong
Kailangang gawin iyon ng iyong chatbot — ngunit sa platform na iyong pinili.
1. Pagkuha ng Pagpili ng Sangay ng Gumagamit
Dahil malamang na maraming lokasyon ang iyong negosyo, kailangang malaman ng bot kung aling branch ang gusto ng user bago ipakita ang availability.
- Magdagdag ng single-choice node para hilingin sa user na pumili ng lokasyon.
- Gumawa ng variable (hal., workflow.branch) para iimbak ang kanilang pinili.
- Gagamitin mo ito mamaya para ipadala ang tama Calendly link batay sa napiling sangay.
Tinitiyak nito na ang lahat ng link sa pag-iiskedyul at mga tugon ay iniangkop sa tamang sangay.
.webp)
2. Gamit ang Calendly Daloy ng Trabaho ng Kaganapan
Ang Hub nagbibigay din ng prebuilt workflow na direktang kumokonekta sa iyong Calendly setup.
- Sa seksyong Mga Workflow , hanapin ang Calendly Event Workflow .
- I-click ang I-clone upang gawin ang iyong nae-edit na bersyon.
- I-customize ang daloy kung kinakailangan — naka-set up na ito upang bumuo ng link sa pag-book na nakatali sa session ng user gamit ang conversationId .
Sa pamamagitan ng pagpasa sa ID ng pag-uusap, bumubuo ang chatbot ng natatanging link sa pag-book na maaaring masubaybayan sa mga indibidwal na user. Ang prebuilt workflow na ito ay nakakatipid ng oras at tinitiyak na ang iyong logic sa pag-iiskedyul ay naka-wire na nang tama.
.webp)
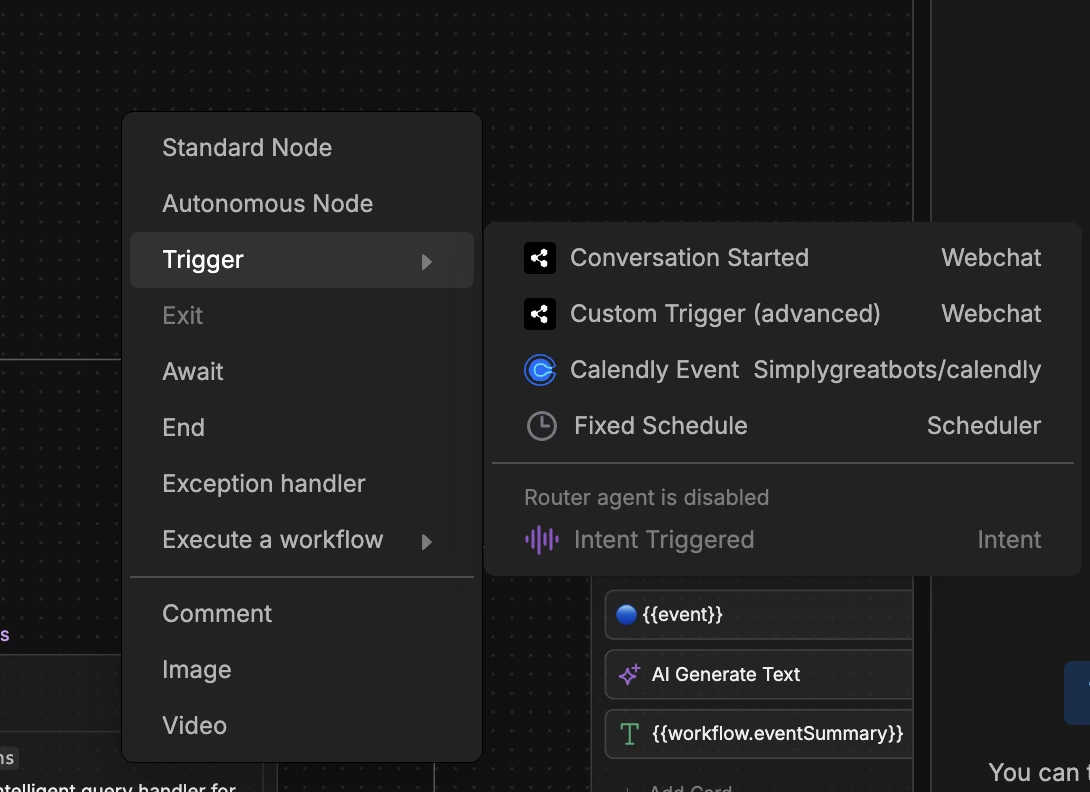
3. Pagse-set Up ng Calendly Trigger ng Kaganapan
Kapag naipadala na ang isang link sa pag-book, gusto mong matukoy ng chatbot kung kailan na-iskedyul ng user ang kanilang appointment.
- Mag-right click sa loob ng workflow at magdagdag ng Calendly Event Trigger node.
- In the settings, pass the conversation ID using:
{{event.payload.conversation.id}} - Nagbibigay-daan ito sa chatbot na makinig sa partikular na booking ng user.
- Kapag na-trigger, maaaring awtomatikong magpadala ang bot ng mensahe ng kumpirmasyon.
Pinaparamdam nito na matalino at tumutugon ang bot — at tinitiyak na alam ng mga user na na-book ang kanilang appointment.
4. Pangangasiwa sa Impormasyon sa Negosyo at Mga FAQ
Hindi lahat ay diretsong mag-book. Maaaring magtanong muna ang ilang user tungkol sa pagpepresyo, oras, o serbisyo. Magagawa mo ito sa pamamagitan ng pagkonekta sa iyong base ng kaalaman .
- Magdagdag ng autonomous node na naka-link sa knowledge base.
- Paganahin ang paghahanap ng kaalaman upang makuha ng bot ang mga tugon mula sa mga na-upload na dokumento o talahanayan.
- Gamitin ang node na ito bilang fallback kapag nagtanong ang mga user ng mga pangkalahatang tanong.
Sa ganitong paraan, mananatiling kapaki-pakinabang ang iyong bot — kahit para sa mga user na hindi pa handang mag-book.
.webp)
Hakbang 5: Pag-deploy ng Chatbot
Sa ganap na binuo ang chatbot, ang huling hakbang ay i-deploy ito sa channel na gusto mo. Para sa halimbawang ito ay pipiliin natin WhatsApp upang ang mga gumagamit ay maaaring direktang makipag-ugnayan dito. Nagbibigay-daan ito sa tuluy-tuloy na pag-iiskedyul ng appointment at agarang pagtugon sa mga karaniwang katanungan — lahat sa loob ng isang pamilyar na app sa pagmemensahe.
Narito kung paano ikonekta ang iyong chatbot sa WhatsApp :
- Pumunta sa Home mula sa kaliwang menu.
- I-click ang Pahintulutan ang WhatsApp at ikonekta ito sa iyong Meta Business Account.
- Sundin ang mga hakbang sa screen upang makumpleto ang pag-setup.
Kapag nakakonekta na, magiging live ang iyong chatbot WhatsApp — handang pangasiwaan ang mga tunay na pag-uusap sa iyong mga customer.
Mag-deploy ng Booking Chatbot sa Susunod na Linggo
Gumagamit ang mga negosyo sa buong industriya ng mga chatbot sa pag-book para i-streamline ang mga reservation, bawasan ang mga error, at magbigay ng 24/7 na serbisyo sa customer—lahat habang pinapahusay ang kahusayan sa pagpapatakbo.
Botpress ay ang enterprise-grade platform para sa pagbuo ng secure, scalable na mga chatbot sa booking na iniayon sa iyong mga pangangailangan.
Gamit ang tuluy-tuloy na pagsasama, developer-first na tool, at advanced na feature sa pag-customize, maaari mong i-automate ang mga workflow sa pag-book at maghatid ng walang kamali-mali na karanasan ng customer.
Simulan ang pagtatayo ngayon. Ito'y LIBRE.
Mga FAQ
1. Anong mga uri ng negosyo ang higit na nakikinabang mula sa mga chatbot sa pag-book ng appointment?
Ang mga negosyong regular na nag-iskedyul ng mga appointment – tulad ng mga medikal na klinika, fitness center, salon, mga serbisyo sa sasakyan, legal na kasanayan, at multi-location service chain – higit na nakikinabang mula sa mga chatbot sa pag-book ng appointment.
2. Paano pinapahusay ng chatbot ang mga rate ng pagpapakita ng customer para sa mga appointment?
Pinapabuti ng chatbot ang mga rate ng pagpapakita ng customer sa pamamagitan ng awtomatikong pagpapadala ng mga mensahe ng kumpirmasyon at mga huling-minutong update o mga opsyon sa pag-reschedule, na nakakatulong na mabawasan ang pagkalimot.
3. Paano maihahambing ang chatbot na ito sa tradisyonal na mga form ng booking?
Kung ikukumpara sa mga tradisyunal na form sa pag-book, nag-aalok ang chatbot ng interactive, karanasan sa pakikipag-usap na gumagabay sa mga user sa totoong oras at nagpe-personalize ng booking, binabawasan ang mga rate ng pag-drop-off at pagpapabuti ng kasiyahan ng user.
4. Gaano nasusukat ang solusyong ito para sa isang negosyong may dose-dosenang sangay?
Ang mga chatbot sa pag-book ng appointment ay lubos na nasusukat; maaari silang gumamit ng logic na nakabatay sa lokasyon o mga API upang mag-alok ng mga personalized na opsyon batay sa input ng user, na ginagawang may kakayahang pamahalaan ang mga booking sa daan-daang sangay nang walang karagdagang setup.
5. Ano ang mga pangunahing limitasyon ng appointment chatbots?
Kabilang sa mga pangunahing limitasyon ng appointment chatbots ang limitadong kakayahang lutasin ang mga isyu kung mabibigo ang mga pagsasama ng kalendaryo o CRM at ang pangangailangan para sa patuloy na pagsasanay upang manatiling tumpak at kapaki-pakinabang sa lahat ng mga sitwasyon.


%20(1).webp)

