.webp)


- Booking chatbots help people schedule appointments while also answering practical questions all within chat apps like WhatsApp.
- An AI booking chatbot engages customers in natural conversation and handles follow-ups without burdening staff.
- For this tutorial, you will need a Calendly Standard or higher plan, though the 15-day free trial works too.
- You can build the chatbot in Botpress by defining its role, adding a knowledge base, and integrating it with your scheduling tool.
Booking an appointment isn’t just about picking a time slot — it’s about making sure the customer shows up. People don’t just schedule; they ask about locations, pricing, discounts, business hours, and whether the visit is worth their time.
For multi-chain businesses, handling these inquiries across multiple locations can be overwhelming. Calls and emails pile up, customers drop off, and lost appointments mean lost revenue.
The solution? Build an AI chatbot that not only automates scheduling but also provides instant, accurate answers — right on WhatsApp.
Before we dive into building, let’s take a step back.
The goal of this chatbot is simple: help customers book appointments with confidence — and reduce the back-and-forth your team deals with every day. But appointment booking isn’t just about picking a time slot. Customers want to know things like:
- Which location is closest?
- Are there any discounts running?
- What time does the gym open on weekends?
- Can I reschedule if something comes up?
A good booking bot doesn’t just handle scheduling — it answers these questions too. And when you deliver all that in a single WhatsApp conversation, more people follow through with their bookings.
To build your chatbot, you’ll need:
- Calendly (Standard Plan) – Required for API access. You can start with the 14-day free trial.
- Meta Business Account – Free and required for WhatsApp integration.
- Botpress Account – Free to create and used for building and managing the chatbot logic.
You can either set these up beforehand — or follow along with the guide step by step.
Step 1: Define Bot Purpose
Before opening any tool, take a minute to sketch out what your bot needs to do — this saves time later when you're connecting Calendly, uploading info, or wiring workflows.
Ask yourself:
- Who is your audience? First-time gym visitors? Members looking to reschedule?
- What should the bot help with? Booking appointments, answering FAQs, sharing locations?
- What kind of inputs should it handle? Quick replies like “Book a class” — or natural language like “I want to visit the downtown location this weekend”?
- Should it offer handoff? If someone’s confused, will the bot bring in a human or try to guide them back?
Sketching this out now helps you design cleaner flows — and avoid rebuilds when you start layering in knowledge bases or logic triggers.
Pro tip: Start small. A single-location booking bot that answers 5–10 key questions is way more valuable (and launchable) than an over-engineered bot that tries to do everything.
Step 2: Add Knowledge Base
A knowledge base is a collection of information that your chatbot can use to answer questions — like a reference library for your business.
Instead of hardcoding every response, you can upload documents or tables that the bot can search through when users ask about things like pricing, services, or operating hours.
You can think of it as the content that powers your chatbot’s brain.
Upload static business information
Start by uploading a simple, structured document that covers the most common questions customers ask. This could be a PDF, Word doc, or spreadsheet — just make sure it’s organized clearly.
Your document should include:
- Branch locations and addresses
- Services available at each location
- Pricing, discounts, and membership options
- Operating hours and contact details
Each topic should have its clear section, so the chatbot can easily find and return relevant answers.
Tip: Use headers and bullet points in your document to keep things scannable for both the bot and your team.
You can upload this document by heading to the Knowledge Base section:
- From your project, open the left-hand menu.
- Click Knowledge Base.
- Select Upload document and add your file.
Give the document a clear name (e.g., Branch Details – March 2025) so you can reference it later in workflows or queries.
Once uploaded, the chatbot can instantly start using the document to answer user questions — no extra training or coding is needed.
.webp)
Using tables for dynamic information
For things like upcoming events, seasonal offers, or rotating schedules, it’s better to use a table instead of uploading a static document. Tables let you update just one row without touching the rest of your data — making it faster to maintain.
Here’s how to create a table in your knowledge base:
- Go to the Knowledge Base section from the left-hand menu.
- Click Create New, then select Table.
- Name your table (e.g., Event Schedule).
- Add columns for the types of info you want the chatbot to retrieve, like:
- event_name
- date
- location
- price
- description
- Start adding rows for each event or item you want the bot to reference.
Once your table is saved, you can use it to power dynamic responses. For example, when a user asks, “What events are happening next weekend?”, the bot can pull the relevant row and give them a direct answer.
.webp)
Optimizing costs with cached FAQs
One of the biggest challenges with AI-powered bots is cost — especially if the bot hits the LLM every time someone asks a common question.
The knowledge base helps reduce this by automatically caching answers to frequently asked questions. That means if five people ask, “What’s the gym’s weekend schedule?”, the platform only queries your knowledge base or LLM once — then reuses that answer instantly the next time.
You don’t need to configure anything. Caching kicks in automatically if:
- The answer comes from structured content (a document, table, or FAQ)
- The bot is connected to an LLM or RAG pipeline
- The user stays in the same topic thread
This keeps your bot fast — and cuts down on token usage without compromising the experience.
Step 3: Add Calendly Integration
To enable your chatbot to schedule appointments, you need to connect Calendly with Botpress. This allows the bot to access available time slots and generate booking links for users.
Install the Calendly integration
Start from your project dashboard:
- Go to the Hub from the left-hand menu.
- Search for Calendly and click Install.
- Once installed, open the Calendly Integration settings from your project.
Generate and add your Calendly API key
Next, you’ll need to generate a personal API key from Calendly and add it to the workflow:
- Log in to your Calendly account.
- Click Integrations & Apps from the left-hand menu.
- Scroll down to API & Webhooks and click Get a token now.
- Name the token (e.g., Access) and complete two-factor authentication if prompted.
- Copy the API key — you won’t be able to view it again later.
- Return to Botpress and paste the key into the Calendly Integration settings.
- Click Save to finalize the connection.
Once connected, your chatbot will be able to fetch availability data and generate scheduling links based on the user’s location or preferences.
Step 4: Build Chatbot Workflow
Now that Calendly is connected, it’s time to build the chatbot logic — or what Botpress calls a workflow. This is where you decide how the conversation will go: what the bot should say, what info it should collect, and how it should respond based on the user’s choices.
Think of it as setting up a flowchart for a front desk assistant. If someone walks in and says, “I want to book a trial session at the downtown gym,” the assistant would:
- Ask which location
- Pull up the right schedule
- Share a link to book
- Confirm the appointment
- Answer any follow-up questions
Your chatbot needs to do exactly that — but on the platform of your choice.
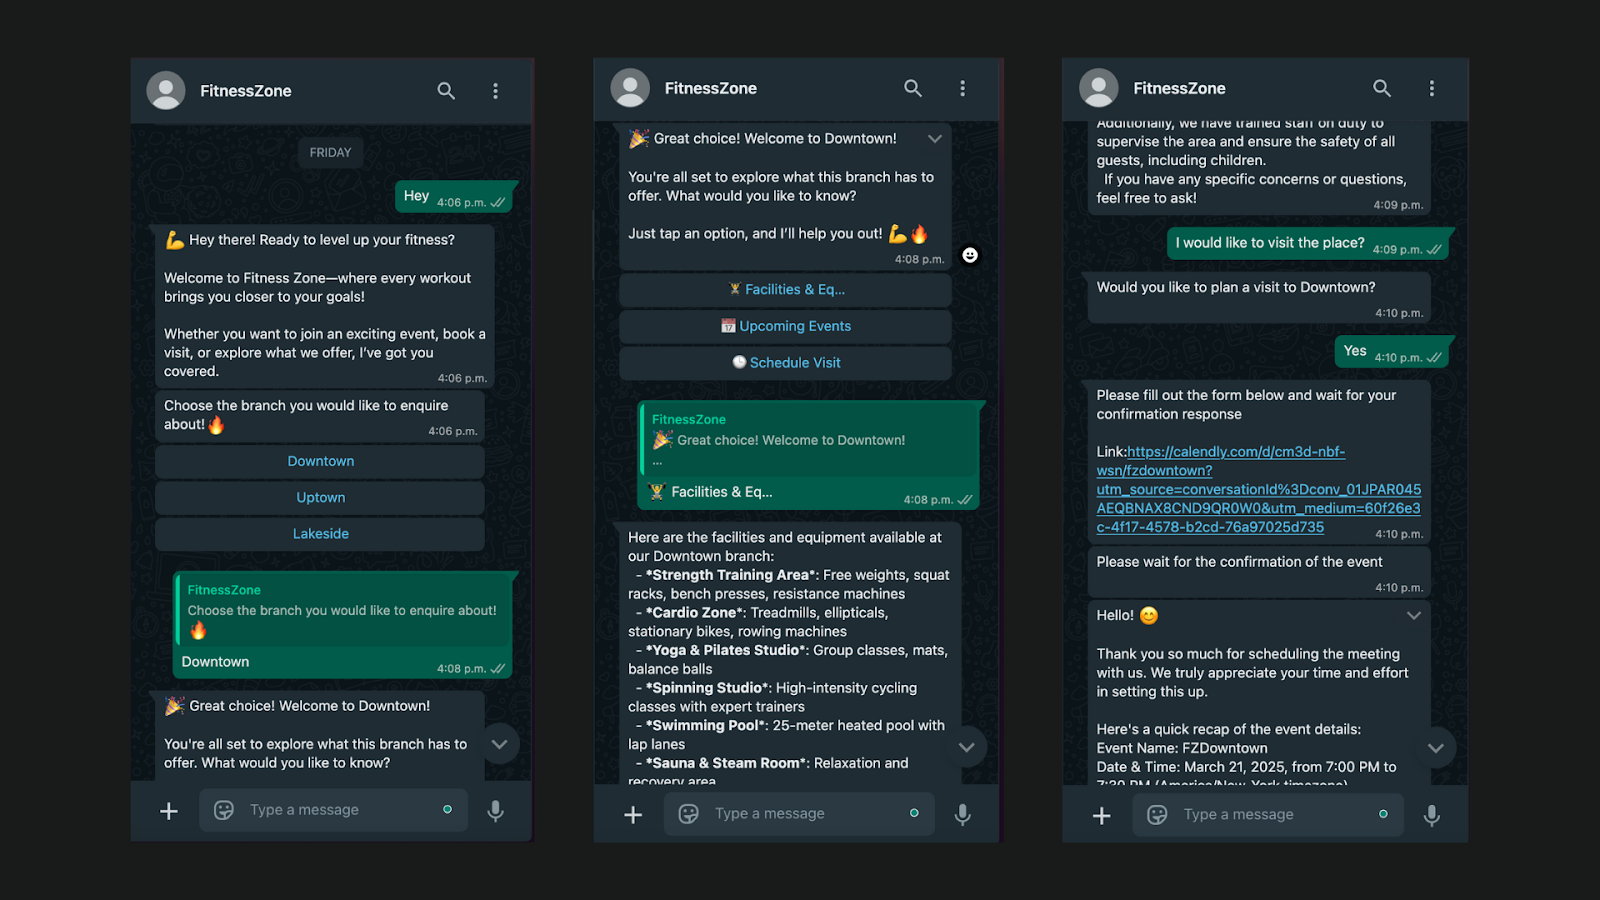
1. Capturing the User’s Branch Selection
Since your business likely has multiple locations, the bot needs to know which branch the user wants before showing availability.
- Add a single-choice node to ask the user to pick a location.
- Create a variable (e.g., workflow.branch) to store their selection.
- You’ll use this later to send the right Calendly link based on the chosen branch.
This ensures that all scheduling links and responses are tailored to the right branch.
.webp)
2. Using the Calendly Event Workflow
The Hub also provides a prebuilt workflow that connects directly to your Calendly setup.
- In the Workflows section, search for Calendly Event Workflow.
- Click Clone to create your editable version.
- Customize the flow if needed — it’s already set up to generate a booking link tied to the user’s session using the conversationId.
By passing the conversation ID, the chatbot generates a unique booking link that can be tracked to individual users. This prebuilt workflow saves time and ensures your scheduling logic is already wired up correctly.
.webp)
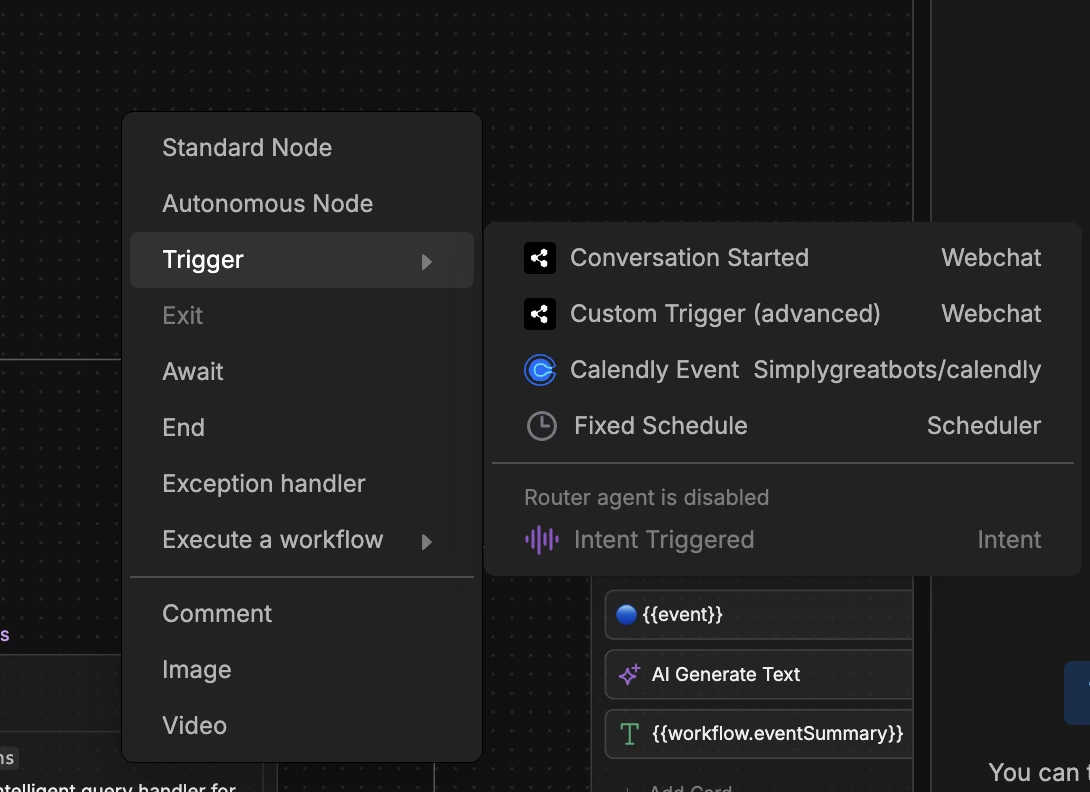
3. Setting Up the Calendly Event Trigger
Once a booking link is sent, you want the chatbot to detect when the user has scheduled their appointment.
- Right-click inside the workflow and add a Calendly Event Trigger node.
- In the settings, pass the conversation ID using:
{{event.payload.conversation.id}} - This allows the chatbot to listen for the user’s specific booking.
- When triggered, the bot can send a confirmation message automatically.
This makes the bot feel smart and responsive — and ensures users know their appointment was booked.
4. Handling Business Information and FAQs
Not everyone will jump straight into booking. Some users might ask about pricing, hours, or services first. You can handle this by connecting your knowledge base.
- Add an autonomous node that’s linked to the knowledge base.
- Enable knowledge search so the bot can pull responses from uploaded documents or tables.
- Use this node as a fallback when users ask general questions.
This way, your bot stays helpful — even for users who aren’t ready to book yet.
.webp)
Step 5: Deploying Chatbot
With the chatbot fully built, the final step is to deploy it on you channel of your choice. For this example we will be choosing WhatsApp so users can interact with it directly. This allows seamless appointment scheduling and instant responses to common inquiries — all within a familiar messaging app.
Here’s how to connect your chatbot to WhatsApp:
- Go to Home from the left-hand menu.
- Click Authorize WhatsApp and connect it to your Meta Business Account.
- Follow the on-screen steps to complete the setup.
Once connected, your chatbot will be live on WhatsApp — ready to handle real conversations with your customers.
Deploy a Booking Chatbot Next Week
Businesses across industries are using booking chatbots to streamline reservations, reduce errors, and provide 24/7 customer service—all while improving operational efficiency.
Botpress is the enterprise-grade platform for building secure, scalable booking chatbots tailored to your needs.
With seamless integrations, developer-first tools, and advanced customization features, you can automate booking workflows and deliver a flawless customer experience.
Start building today. It’s free.
FAQs
1. What types of businesses benefit most from appointment booking chatbots?
Businesses that regularly schedule appointments – like medical clinics, fitness centers, salons, automotive services, legal practices, and multi-location service chains – benefit most from appointment booking chatbots.
2. How does a chatbot improve customer show-up rates for appointments?
A chatbot improves customer show-up rates by automatically sending confirmation messages and last-minute updates or rescheduling options, which helps reduce forgetfulness.
3. How does this chatbot compare to traditional booking forms?
Compared to traditional booking forms, a chatbot offers an interactive, conversational experience that guides users in real tim and personalizes booking, reducing drop-off rates and improving user satisfaction.
4. How scalable is this solution for a business with dozens of branches?
Appointment booking chatbots are highly scalable; they can use location-based logic or APIs to offer personalized options based on user input, making them capable of managing bookings across hundreds of branches without additional setup.
5. What are the key limitations of appointment chatbots?
The key limitations of appointment chatbots include a limited ability to resolve issues if calendar or CRM integrations fail and the need for ongoing training to stay accurate and useful across all scenarios.