


- WordPress powers over 40% of the web, making it the perfect platform to host and run your chatbot.
- Chatbots keep visitors engaged by instantly answering questions, guiding navigation, capturing leads, and offering support without human intervention.
- To deploy a chatbot on WordPress.com, you need a paid plan (but WordPress.org hosting is free).
- You can build a chatbot by setting its purpose, adding knowledge sources, and designing workflows visually in Botpress.
Your visitors have questions—lots of them. If they can’t find quick answers, they leave. If they need help outside business hours, they’re gone. And if your contact form just sits there hoping for responses? That’s lost potential.
A WordPress chatbot changes all that. It’s an instant-response AI chatbot, available 24/7 to engage visitors, answer FAQs, qualify leads, and even drive sales. The best part? You don’t need to code, overcomplicate setup, or rely on clunky plugins.
In this guide, I will show you how you can very easily integrate a large language model (LLM) powered model into your chatbot to boost intelligence, ROI, and user engagement.
Why use a WordPress Chatbot?
WordPress runs over 40% of the web, making it the top choice for businesses and e-commerce. If your site is on WordPress, a chatbot can enhance user experience and engagement effortlessly.
Instead of letting visitors navigate your site on their own, a chatbot proactively assists them, answers questions instantly, and keeps them moving toward a purchase, sign-up, or inquiry. Here’s how it makes a difference.
1. Instantly Answers Visitor Questions
Instead of making users search through multiple pages for information, a chatbot provides immediate answers to common questions.
Example: A visitor to a fitness coaching website wants to know about pricing. Instead of hunting through menus, they type "How much does a personal training plan cost?" The chatbot instantly replies with package details, upselling a free consultation call for more info.
2. Guides Users to the Right Content
Not every visitor knows where to look. A chatbot acts as a virtual guide, directing them to relevant pages, blog posts, or product pages based on their queries.
Example: A potential customer lands on an eco-friendly skincare store but isn't sure which moisturizer suits their skin type. The chatbot asks, "Is your skin dry, oily, or combination?" and recommends a matching product, linking them directly to the checkout page.
3. Reduces Drop-Offs and Cart Abandonment
A chatbot can proactively engage users who hesitate before making a purchase or signing up, reducing the chances of them leaving without taking action.
Example: A visitor on a travel booking website adds a flight to their cart but doesn’t check out. The chatbot pops up: "Still thinking about your trip? Prices for your flight to Paris are increasing soon!" prompting them to complete the booking before missing out.
4. Automates Repetitive Support Tasks
Instead of overwhelming customer support teams with basic inquiries, chatbots handle frequently asked questions, order tracking, and refund policies, allowing human agents to focus on complex issues.
Example: An online fashion store user asks, "Where’s my order?" The chatbot pulls tracking information and responds: "Your package is out for delivery and should arrive today by 5 PM.".
5. Engages and Captures Leads 24/7
Unlike live chat, a chatbot never goes offline. AI lead generation is 24/7, 365 days a year. Even outside business hours, it can engage visitors, answer queries, and collect leads for follow-up.
Example: A startup founder visits a web agency’s site at midnight, curious about pricing. The chatbot asks, "Want a custom quote? Drop your email, and we’ll send it in the morning." Lead captured—even though Paul from Sales was asleep.
Applications of WordPress Chatbots
For every application, a WordPress chatbot is more than just a virtual assistant—it’s a strategic tool that integrates with existing business systems to enhance efficiency, improve customer interactions, and drive revenue.
From customer support automation to lead qualification and operational workflows, chatbots can seamlessly work alongside the tools existing workflows already rely on, such as CRMs, help desks, and marketing automation platforms.
How to Build a WordPress Chatbot
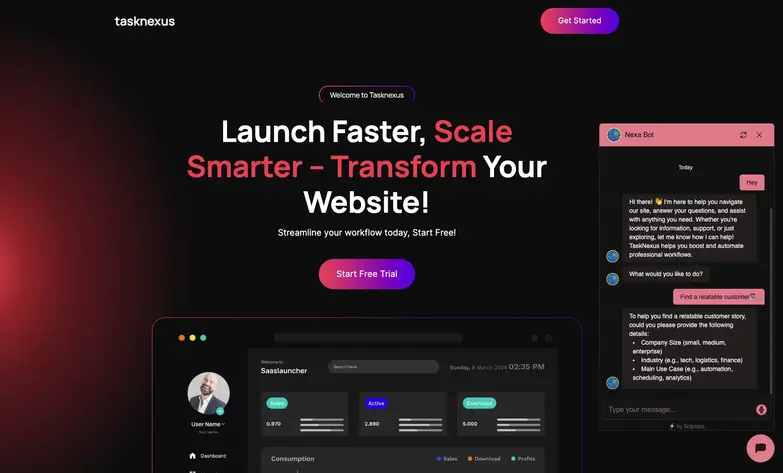
For this example, we’ll build a chatbot for Task Nexus, a SaaS website that helps users find the right tools for project management. The chatbot will:
- Answer user questions about Task Nexus’s features and services.
- Retrieve customer case studies and suggest relevant success stories based on user needs.
- Use LLM-powered responses to match user queries with the closest available case study.
Now, let’s jump into the steps.
Step 1: Set Up Your Chatbot Project
Before you start designing conversations, you need to define the chatbot’s purpose and configure its behavior. This ensures the chatbot aligns with your business goals and delivers the right user experience.
a) Create a new project in Botpress and select "Start from Scratch" for full customization.
b) Define the chatbot’s purpose and tone of voice.
- Is the chatbot providing customer support, assisting with sales, or offering general site navigation?
- Set Agent Instructions to dictate how the bot should interact with users.
This step is crucial because it sets the foundation for how the chatbot will function. A well-defined chatbot behaves more predictably and ensures a smooth user experience.
Step 2: Add Your Website & Documents for AI Retrieval
A chatbot is only as smart as the information it has access to. Instead of manually programming responses to every question, Botpress lets you import external knowledge sources so the chatbot can generate accurate answers dynamically.

a) Go to the "Knowledge Base" section in Botpress.
b) Upload your website link to allow the chatbot to reference specific pages for information.
c) Add documents as txt or pdf files to add further information specific to your pitch deck or FAQs.
This ensures the chatbot delivers accurate answers by pulling from FAQs or service pages, eliminating manual updates.
Step 3: Create Tables for Dynamic information
If your chatbot needs to capture leads or store data, Botpress Tables collect structured details like names, emails, and inquiry types. This is how you bring them into your workflow.
.webp)
a) Go to "Tables" in the Botpress menu.
b) Create a new table (e.g., "customerLeads").
c) Define the columns based on the data you need to store:
- Name (to personalize responses)
- Email (for follow-ups)
- Company Name (to tailor suggestions)
- Inquiry Type (to categorize requests)
Without this step, any data the chatbot collects is temporary and cannot be referenced later. Storing it properly allows for follow-ups, analytics, and workflow automation.
Step 4: Build the Workflow
Once we have declared the knowledge sources, we can go ahead and integrate this knowledge with LLMs to create an workflow for our chatbot.
.webp)
1. First Message: Starting the Conversation
The chatbot greets the user and provides three options:
- Know more about the product → Leads to the FAQ node.
- Find a relatable customer → Directs users to Customer Success for lead capture.
- Close conversation → Ends the chat.
This ensures users quickly find relevant information without unnecessary back and forth.
.webp)
2. Handling FAQs with an Autonomous Node
If a user selects "Know more about the product," the chatbot searches indexed data to provide structured answers. If it detects sales intent (e.g., questions about pricing or implementation), it redirects them to Customer Success instead of ending the conversation.
This keeps high-intent users engaged in the sales funnel instead of dropping off after a basic FAQ response.
.webp)
3. Workflow to Show Customer Success Stories
Users who want customer success stories or show buying intent are led into a conversational flow where the chatbot collects key details:
- Company size
- Industry
- Name & email for follow-up
This data is stored in leadsTable for future outreach. If the user expresses interest, the chatbot offers to email case studies or connect them to sales.
This ensures potential leads are captured and engaged beyond a single conversation.
Step 5: Add the Chatbot to Your WordPress Site
Now that your chatbot is ready, embed it into WordPress so visitors can interact with it.
1. Install WPCode Plugin
- Log in to your WordPress dashboard.
- Go to Plugins → Add New, search for WPCode, then click Install & Activate.
- Once activated, you’ll see a new Code Snippets menu in the left-hand sidebar.
2. Get the Botpress Webchat Script
- Log in to Botpress and go to the Integrations tab.
- Click Webchat, then copy the Embedded script from the Pre-configured tab.
.webp)
3. Add the Script to WordPress
- In WordPress, go to Code Snippets → Headers & Footers.
- Paste the Embedded script in the Body section.
- Click Save Changes to apply.
Your chatbot is now integrated and should appear on your website. Refresh the page to test it.
Best Practices for Deploying a WordPress Chatbot
Deploying a chatbot on your WordPress site requires more than just installation—it must be secure, reliable, and aligned with business goals. Here are key best practices to ensure your chatbot enhances user experience while maintaining data security and compliance.
1. Control Access and Authorizations
Not everyone should have the same level of control over your chatbot. Implement role-based access to restrict permissions, ensuring only authorized team members can edit workflows, access user data, or modify integrations. Control access is a mainstay of any chatbot security strategy.
Best Practice: Use multi-factor authentication (MFA) and platform-based permissions (e.g., WordPress user roles, API keys) to prevent unauthorized changes.
2. Limit Data Collection and Storage
Collect only the data you need. Storing unnecessary customer details increases security risks and compliance concerns, especially with GDPR, CCPA, or other data privacy laws.
Best Practice: Configure your chatbot to mask sensitive data (like payment details) and automatically delete records after a set retention period.
3. Secure Third-Party Integrations
Many enterprises integrate chatbots with CRMs, ticketing systems, and e-commerce platforms. Ensure these integrations follow security best practices and do not expose sensitive information through poorly configured APIs.
Best Practice: Use encrypted API connections, restrict data sharing to necessary fields, and conduct regular security audits on third-party integrations.
Take Your WordPress Chatbot Live
Enhance your WordPress site with a chatbot that does more than just answer questions. Automate support, capture leads, and guide visitors with AI-driven conversations and dynamic workflows.
With Botpress, you get Autonomous Nodes for intelligent interactions, AI Transitions for adaptive responses, and workflows designed to streamline engagement—all without complex setup.
Build a smarter chatbot today. Get started today—it's free.
FAQs
1. How can I test the chatbot before going live?
To test your chatbot before going live, use the built-in emulator inside Botpress. It allows you to simulate conversations in a controlled environment, previewing how your bot responds in real-time without affecting your live website.
2. Is it possible to connect multiple chatbots to different subdomains of the same site?
Yes, you can connect multiple chatbots to different subdomains by deploying separate chatbot instances in Botpress and embedding each one using its unique JavaScript snippet. This allows each subdomain to have a bot tailored to its specific content or audience.
3. How do I make my chatbot GDPR-compliant?
To make your chatbot GDPR-compliant, ensure it only collects necessary personal data, and informs users about how their data will be used. You should also implement data access and deletion procedures as required by the regulation.
4. What happens if the chatbot can’t find an answer to a user’s question?
If the chatbot can’t find an answer, you can configure a fallback flow to acknowledge the gap, suggest rephrasing, offer relevant links, or escalate to a human agent. This keeps the experience smooth even when the bot doesn’t know the answer.
5. How often should I retrain the LLM or update the knowledge base?
You don’t need to retrain the LLM itself if you're using a retrieval-based setup; instead, update your knowledge base regularly – ideally once a month or whenever key business content changes. This ensures the chatbot remains accurate and up-to-date without full model retraining.