


- Wix chatbots use AI and large language models (LLMs) to provide 24/7 support, handle bookings, answer FAQs, and engage users interactively.
- Common applications include customer support, lead generation, e-commerce assistance, booking services, and interactive experiences like quizzes and surveys.
- Key benefits of adding a chatbot to your Wix site include faster response times, automated data collection, personalized user journeys, and reduced manual workload.
- Best practices include focusing on core use cases first, testing thoroughly (especially on mobile), ensuring privacy compliance if collecting user data, and regularly updating chatbot content and logic.
Thinking about building an AI chatbot that’s scalable, versatile, and reliable for your Wix website? A chatbot powered by large language models (LLMs) can answer site queries, engage in discussions, book appointments, and manage data.
With the right tools, building a Wix chatbot is not as complex as it might seem. In this guide, I’ll show you how to make and deploy such a chatbot in 5 easy steps.
Applications of a Wix Chatbot
Chatbots can take your website to the next level, whether you're running an e-commerce store, offering services, or hosting a personal blog.
Chatbots streamline repetitive tasks, free up your time, and ensure users get what they need without delays. Beyond just efficiency, chatbots bring personalization to the table. They can tailor interactions to individual users, creating a more engaging and memorable experience.
Customer Support
Chatbots can handle routine customer inquiries, reducing response times and providing 24/7 support. Beyond simple FAQs, they can track customer sentiment, gather feedback, and integrate with CRM systems for highly personalized support.
Examples: Resolving FAQs, escalating tickets, live chat responses.
Lead Generation
Using conversational flows, chatbots can collect user information, qualify leads, and nurture potential customers. This makes it easy to turn casual visitors into prospects by engaging them with relevant information at the right time.
Examples: Capturing contact details, lead qualification, personalized engagement.
E-Commerce Assistance
Chatbots simplify online shopping by helping users find products, track orders, or manage returns. They also guide customers through checkout processes, ensuring a seamless and frustration-free experience.
Examples: Product recommendations, order tracking, and return assistance.
Booking Services
Automate appointment scheduling or reservations with chatbots. They can handle availability checks, confirmations, and even reminders, removing the need for manual intervention.
Examples: Scheduling consultations, booking services, and sending reminders.
Interactive Experiences
Chatbots can entertain and engage visitors through interactive workflows like quizzes, surveys, or games. These features keep users engaged and coming back for more, creating a lasting impression.
Examples: Conducting surveys, running quizzes, facilitating onboarding workflows.
How to Build a Wix Chatbot
Ready to create the chatbot? Let’s break it down step by step. However, before moving on, please check that you have the following prerequisites:
- Your Wix website must be on the Premium (or higher) plan to enable adding custom scripts.
- Create a Botpress Account
For the tutorial, we will be creating a chatbot for an NGO website. This chatbot will be able to answer queries about the website and collect some information from the user in a very natural yet dynamic manner.
Step 1: Set Up Your Project
For the first step, we will set up the chatbot project and the general working conditions for the chatbot. Here’s how you can do it:
1. Start by creating a new project in Botpress and select the "Start from Scratch" template for complete customization and flexibility.
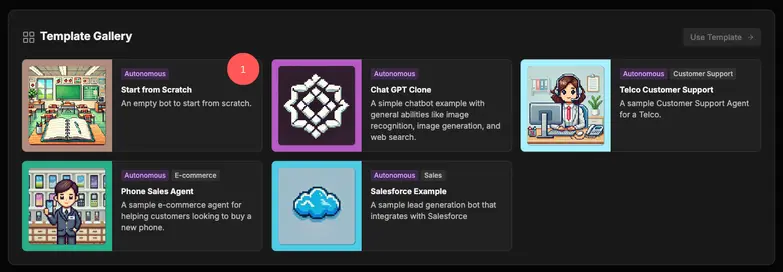
2. Define your chatbot’s purpose and tone of voice to ensure it aligns with your website.
.webp)
This initial step really helps you capture and dictate your Chatbot's further behaviour.
From choosing the way the bot talks and replies to users, to the direction and conclusions you want your conversations to be taken, everything can be easily broken down into instructions for the bot to follow.
Step 2: Add the Knowledge Base
After setting up the project, import external knowledge for your chatbot to use when answering user queries. This information can be brought in multiple forms such as documents, webpages, or tables. Here’s how you can do it:
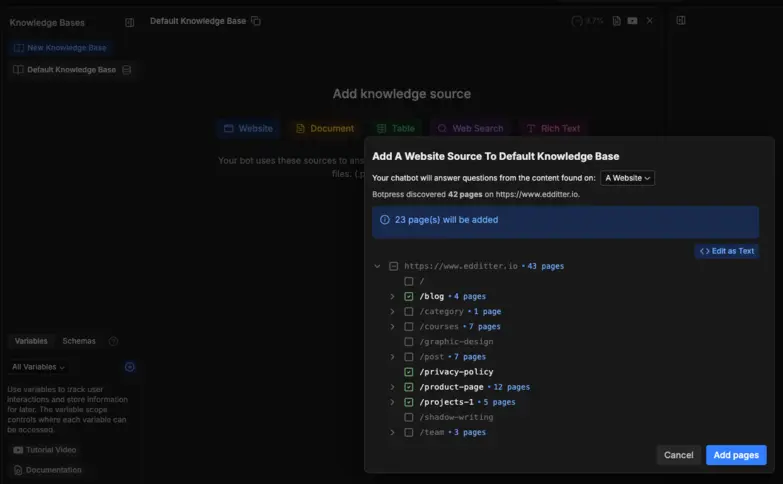
1. Go to the “Knowledge Base” section from the menu on the left of the screen.
2. Upload a website link to index specific pages for chatbot queries.
3. Select specific pages you want to be indexed and further used for answering user queries.
Step 3: Add Tables
If you wish to collect data from users, you can do so by categorically storing them in tables. For the sake of our website, we want to collect volunteer information, so we will create a table called “volunteerTable”. Here’s how you can do it:
a. Head over to “Tables”
b. Create a new table to hold user-collected variables and information.
c. Add columns according to the data that needs to be collected from the user.
.webp)
Step 4: Make the Workflow
Workflows are the heart of your chatbot’s functionality. Here are the key building blocks:
- Standard Node: A fundamental unit in workflows, standard nodes execute predefined actions and guide the conversation flow based on set transitions.
- Autonomous Node: Leveraging LLMs, these nodes make context-based decisions, manage conversation flows, and determine appropriate actions without manual intervention.
- AI Transition: An AI Task card that classifies text into predefined categories, aiding in intent recognition and topic extraction without extensive training data.
Moving onto the actual workflow of the chatbot, we can head over to “Workflow” from the left side menu, and once inside follow these steps:
.webp)
- Set the Initial Message
Create a Standard Node with a "Text" tile that displays the chatbot's opening message to users.
Example:
"Welcome to our website, your neighborhood NGO. How can we assist you today?" - Create a Menu with Choices
Add a Single Choice Tile below the Text tile. This menu allows users to pick an option, such as:- Learn about Programs
- Volunteer Opportunities
- Link Choices to Autonomous Nodes
For each menu option, link the corresponding choice to an Autonomous Node:- Program Information Node: Provides details about various programs offered by your NGO.
- Volunteer Node: Handles volunteering-related queries and gathers relevant user information.
- Configure the Volunteer Node
- Add an instruction set that directs the bot to reference the website information.
- Grant the bot writing access to the "volunteerTable" created earlier to store volunteer details.
- Add AI Transitions
Implement an AI Transition that detects user intent to exit the volunteering menu. if the user expresses intent to stop, redirect them back to the main menu, restarting the interaction loop.
This workflow ensures smooth navigation, tailored responses, and a seamless user experience.
Step 5: Deploy the Chatbot
Finally, we shall take this chatbot and deploy it onto the Wix website (please note you need to have a premium Wix website). Here’s how you can do it:
- Click 'Publish' in the top-right corner.
.webp)
- Click “Customize Webchat” and then “Share” to get an embed code for your webchat
- Log in to your Wix dashboard and go to “Settings” from the left sidebar and search for “Custom Code”

- Click on "+ Add Code in Body - Start" and paste the Embedded script you copied in the previous step.
.webp)
- Ensure you apply the code to "All pages" and load the code "Once at the Body - end" tag and click "Apply".
Once deployed, your Wix chatbot is ready to engage with visitors, automate tasks, and make your website more interactive and efficient! Volunteer data should also start showing up in your tables shortly after published.
.webp)
Elevate Your Wix Website with Intelligent Chatbots
Empower your Wix site with chatbots that go beyond the basics. From 24/7 customer support to seamless booking automation and personalized interactions, your chatbot can handle it all.
With Botpress, leverage smart intent-based information gathering through Autonomous Nodes, AI Transitions that adapt to conversational flow, and workflows designed to actively understand and enhance user interactions.
Build a chatbot that’s truly intelligent. Get started for free today— personalize and automate with ease.
FAQs
1. How do I decide which chatbot features are most relevant to my Wix site?
To decide which chatbot features are most relevant to your Wix site, start by identifying your site's primary goals – like customer support or lead generation. The chatbot should directly support those goals first (e.g., answering FAQs, taking bookings), before adding secondary features like product quizzes or newsletter signups.
2. Can I use the same chatbot for multiple Wix websites?
Yes, you can use the same chatbot across multiple Wix websites by embedding the same bot script or code snippet on each site. However, it’s best practice to customize the chatbot’s content and branding to align with each site’s unique audience and purpose.
3. What are common pitfalls to avoid when building a chatbot on Wix?
Common pitfalls when building a chatbot on Wix include overcomplicating the bot from the start, neglecting mobile responsiveness, and failing to test real user flows. Another key issue is designing vague or generic replies.
4. Does the chatbot store IP addresses or session data, and how is that handled?
If you're using Botpress with Wix, the chatbot can log session metadata like user location, browser, or conversation history for analytics purposes, but it doesn’t store IP addresses by default unless you explicitly configure it to do so. Botpress gives you control over data collection and complies with privacy regulations like GDPR.
5. Can I train the chatbot to recognize slang, typos, or regional dialects?
Yes, you can train a Botpress chatbot to recognize slang by feeding it example phrases or enabling natural language understanding (NLU) through LLM-based nodes. These models are designed to handle imperfect or casual language and adapt quickly with proper training data.