- AI assistants powered by large language models transform websites into interactive spaces that guide users, answer questions, and reduce abandonment by delivering instant, human-like conversations.
- Industries from customer support to healthcare and sales leverage AI assistants to automate tasks like scheduling, lead qualification, and troubleshooting, enhancing user engagement and operational efficiency.
- To optimize costs and performance, businesses should experiment with different AI models, streamline workflows using autonomous nodes, and manage token usage to maintain efficiency and scalability.
You built a great website. It looks sharp, your content is solid, and you’re getting visitors. But there’s a problem—people leave without taking action. They exit instead of booking a call, abandon carts instead of checking out, and never reach out with questions.
It’s like running a store where customers walk in, look around, and leave without talking to anyone.
You’ve heard ChatGPT is smart—smart enough to write code, draft emails, and even explain quantum physics. But can it also answer customers' questions, guide them to the right product, or help them troubleshoot an issue without making them dig through your website?
Why Websites Need an AI Assistant
An AI assistant uses large language models (LLMs) to understand, process, and generate human-like responses in real time. It interacts with users via text or voice, automating tasks, retrieving information, and assisting with decision-making.
AI assistants aren’t just a fancy add-on—they’re transforming how businesses interact with users across industries.
Customer Support
Nobody likes waiting on hold. AI assistants provide instant responses, reducing ticket volumes and improving resolution times. They handle FAQs, troubleshoot issues, and escalate complex queries to human agents when needed.
Education
AI assistants can answer questions, explain concepts, and provide real-time feedback, acting as on-demand tutors for students. Platforms use AI to offer interactive lessons and quizzes, making learning more engaging.
Healthcare
Patients need quick access to information about symptoms, appointments, and medications. AI-powered assistants help schedule appointments, provide health advice (within guidelines), and offer mental health support through chat-based counseling.
Sales and Lead Generation
For tech companies, AI chatbots act as sales assistants, answering product questions, qualifying leads, and scheduling demos. They also assist existing users by troubleshooting software issues and guiding them through features.
Three Ways to Deploy an OpenAI Assistant
AI-powered assistants are transforming how businesses engage with users, but deploying one isn’t as straightforward as it once was.
OpenAI offers powerful models, but their approach to assistants has changed. The Assistants API remains in beta as of 2025, and OpenAI is shifting focus to GPTs—great for use inside ChatGPT but not directly embeddable on your website.
That leaves you with three real options:
- Build directly with OpenAI (but with limitations) – Since OpenAI has pivoted to GPTs, direct assistant deployment through their platform isn't fully supported.
- Use a no-code chatbot platform – The fastest way to deploy a custom OpenAI bot on your website, is ideal for non-developers.
- Build from scratch with OpenAI’s API – Full control, full flexibility, but requires development work.
Let’s break down which approach is best for your needs.
1. Build it Directly with OpenAI
OpenAI previously introduced the Assistants API, but as of April 2024, its development has stalled, and it remains in beta with no clear roadmap. Instead, OpenAI has shifted its focus to GPTs, allowing users to create tailored AI assistants inside the ChatGPT platform.
.webp)
However, GPTs aren't deployable on external websites—they stay within OpenAI’s ecosystem. If you want a chatbot embedded in your site, you’ll need to use the OpenAI API and build your interface.
2. Use a No-Code AI Assistant Builder
For those who want a quick and scalable solution without heavy coding, no-code AI assistant platforms offer an easy way to deploy chatbots. These platforms provide:
- Pre-built integrations with OpenAI and other AI models.
- Multi-channel deployment on websites, messaging apps, and customer support tools.
- Built-in workflows for managing user interactions, memory, and automation.
Some examples include Botpress, Voiceflow, and Chatbot.com, among others. These tools are ideal for businesses that need a functional AI chatbot without deep development work.
3. Build a Custom AI Assistant from Scratch
For full control, developers can integrate OpenAI’s API with AI agent frameworks like LangChain, vector databases, and custom UI components. This allows advanced features like:
- Retrieval-augmented generation (RAG) for personalized responses.
- Custom integrations with databases, CRMs, and internal tools.
- Advanced memory handling beyond OpenAI’s built-in capabilities.
This method has a learning curve but can often be outsourced to development teams.
Each option has trade-offs, but if you want an AI assistant fully embedded in your website, using OpenAI’s API or a no-code AI assistant builder is the way to go.
Next, let’s walk through how to build and deploy your OpenAI assistant step by step.
How to Build and Deploy an OpenAI Assistant
Here’s how you can build and deploy an OpenAI-powered assistant using a no-code platform like Botpress, ensuring flexibility, accuracy, and a seamless user experience—without writing complex code.
Step 1: Set up your Project
Create a new project in Botpress. Once logged in, select 'Start from Scratch' for full customization and flexibility.
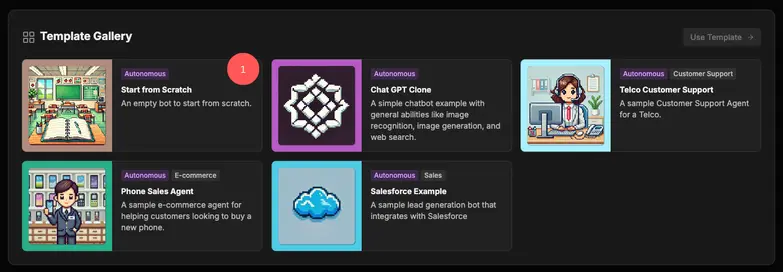
Step 2: Write Clear Instructions
Instructions are crucial for your AI assistant’s behavior, use this opportunity to change the following aspects of how the chatbot interacts with the user and the information.

- Open the "Instructions" section in Studio.
- Define how the assistant should behave:
- Tone and format – Should it be formal, casual, concise, or detailed?
- Knowledge access – What tools, APIs, or data sources should it use?
- Prohibited behavior – What responses should it avoid?
- Save the instructions to apply them to your chatbot.
Step 3: Choose an OpenAI Model for AI Assistant
Botpress Studio allows you to select from different OpenAI models based on your needs:
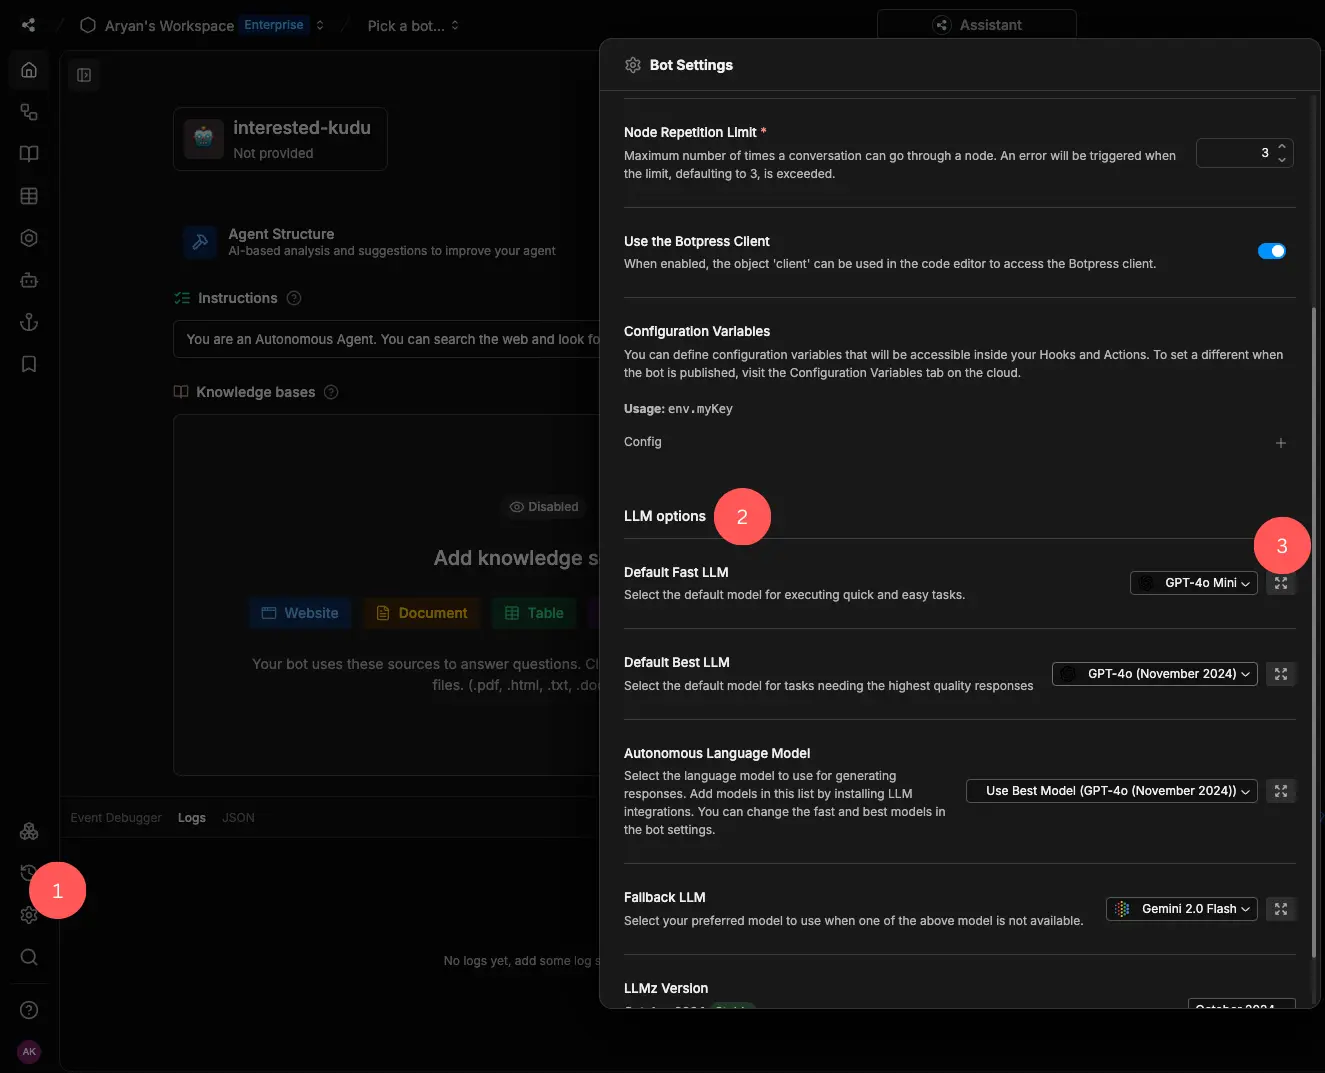
- Open Bot Settings from the main menu.
- Scroll down to LLM options.
- Select a GPT model based on your needs (e.g., GPT-4o mini for speed and cost efficiency).
Different models offer varying trade-offs between cost, speed, and response quality, so choose one that fits your needs. Botpress doesn’t add extra fees on top of LLM provider pricing—check GPT model pricing here.
Step 4: Add Knowledge Sources
To make your AI assistant effective, connect it to relevant external knowledge, such as PDF documents, website URLs, or APIs. Here's how you can do it:
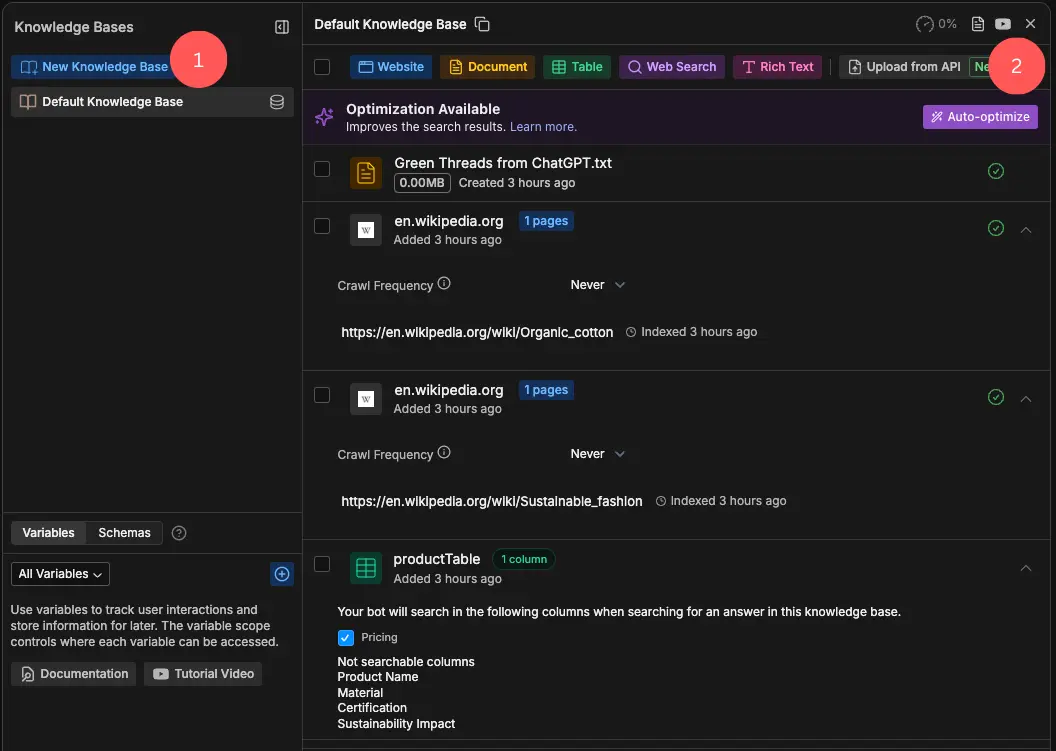
- Go to the “Knowledge Base” section from the menu.
- Upload documents or add URLs of websites as sources.
- The platform should then index the content automatically, segmenting it into smaller, retrievable knowledge chunks.
This ensures that your assistant can pull accurate, up-to-date information when responding to users.
Step 5: Deploy your Chatbot
Once your assistant is configured, it’s time to publish and embed it on your website:
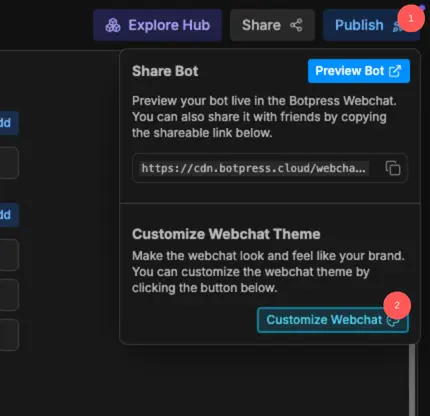
- Click 'Publish' in the top-right corner.
- Go to "Customize Webchat" and then select "Share".
.webp)
- Copy the embed code and paste it into your website’s HTML.
Your OpenAI assistant is now live, ready to assist users in real-time.
Optimizing your OpenAI Assistant for Performance
Once your AI assistant is live, the next step is optimization—ensuring it delivers the best user experience while keeping costs in check. Here are a few key ways to refine its performance:
1. Experiment with Different Model Offerings
Not all AI models perform the same across different tasks. Try different options to balance token usage, user experience, and cost efficiency:
- Switch to a more cost-effective model – If your assistant primarily handles basic queries, consider using a cheaper conversational model like DeepSeek-V3 instead of GPT-4o.
- Use a reasoning-optimized model for complex tasks – Models like OpenAI o1 or o3 provide better logical processing if your assistant needs advanced reasoning or long-context understanding.
2. Enhance Workflows with Autonomous Nodes and AI Transitions
A single prompt-response setup limits what your AI can do. Instead, deepen the assistant’s workflow by:
- Using autonomous nodes to let the AI handle multi-step interactions without manual triggers.
- Implementing AI transitions to guide conversations dynamically based on user input.
- Integrating tool access and APIs to fetch real-time data and enhance responses.
3. Optimize AI Spend and Token Usage
- Monitor AI usage trends to see where tokens are being spent inefficiently.
- Adjust response length and verbosity to reduce token consumption without losing clarity.
- Implement caching or memory features to avoid redundant API calls for repetitive queries.
Fine-tuning these elements helps reduce costs, improve user experience, and make your OpenAI assistant smarter over time.
Deploy an AI Assistant on your Website Today
Users today expect instant, intelligent interactions—waiting is no longer an option. An AI assistant can engage visitors, answer questions, and automate workflows, all while running effortlessly in the background.
With a drag-and-drop visual builder, built-in AI integrations, and flexible customization, Botpress lets you deploy powerful AI assistants without complex coding.
Start building today. It’s free.
FAQs
1. Can I connect the assistant to my existing CRM or internal tools?
Yes, you can connect the assistant to your existing CRM or internal tools using Botpress. Botpress supports API calls and custom JavaScript/TypeScript nodes, making it easy to integrate with platforms like Salesforce, HubSpot, internal databases, or any HTTP-based service.
2. What happens if my knowledge source changes? Do I need to re-upload the entire source?
If your knowledge source changes, you don’t need to re-upload everything. In Botpress, you can update or replace individual documents or data sources in the Knowledge Base, and the system will automatically re-index and reflect the updated content.
3. Can I integrate RAG (retrieval-augmented generation) with Botpress natively?
Yes, you can integrate RAG natively with Botpress. Botpress has built-in RAG support, allowing bots to pull real-time context from connected documents, URLs, APIs, or structured data and use it to generate accurate responses.
4. Can I deploy the assistant on mobile apps or third-party platforms (like WhatsApp, Slack)?
Yes, Botpress supports multi-channel deployment including mobile apps, WhatsApp, Slack, Messenger, Microsoft Teams, and websites. You can use built-in connectors or create custom channels using APIs.
5. Are there community-built templates or workflows I can start from?
Yes, Botpress offers community-built templates and workflows that you can adapt and launch. These include pre-designed flows for lead generation and onboarding to help you get started faster.



.webp)
