Prerequisites
- A Meta developer app. Check out this article to learn more about the setup.
- A WhatsApp Business Platform Account to be your bot's interface on WhatsApp
- A Botpress Cloud account and a Botpress Bot
Business Verification
To deploy a chatbot on your WhatsApp channel, your business must first undergo a verification process by Meta, the parent company of WhatsApp. This verification, typically conducted through the Facebook Business Manager, confirms the identity and eligibility of your business to use Meta's platforms. Checking the official Meta for Developers website or WhatsApp Business API documentation is advisable for up-to-date information on the verification process and API access.
Setting up the WhatsApp integration in Botpress
- Go to the Integration Hub in Botpress Cloud (if you don't have the integration installed yet).
- Find and open the WhatsApp integration then click on the "Install to Bot" button, now go back to your bot.
- Enable "Use Manual Configuration"
The WhatsApp integration will have the following settings:
1. Verify Token
The Verify Token is used by Meta to verify that you are the real owner of the provided webhook.
You can generate any random alphanumeric string for this configuration. Paste it in your Verify Token channel configuration.
2. Phone Number ID
- In your Meta App's left sidebar, expand the WhatsApp menu and select Getting Started
- In the Send and receive messages section, beside the label Phone Number ID click Copy then paste it in the Phone Number ID field in Botpress
3. Client Secret
- In your Meta App's left sidebar, expand the Settings menu and select Basic
- In the App Secret field, click Show then copy and paste it in the Client Secret field in Botpress
4. Access Token
The Phone Number ID and Access Token are used to send and receive messages to/from the WhatsApp API.
- In your Meta App's left sidebar, expand the WhatsApp menu and select Getting Started
- In the Temporary access token section, click Copy and then paste it in the Access Token field in Botpress
5. (Optional): Permanent Access Token
Permanent Access Token can be used to send and receive messages to/from the WhatsApp API without the need to refresh the token every 24 hours.
- Navigate to Business Settings.
- Choose the business account associated with your app.
- Click on
AddunderSystem Users. - Enter a name for the system user, assign the
Adminrole, and clickCreate System User. - Click on
Create Assetand selectAppsfrom the asset type Tab. - Select your app and toggle
Manage App (full control). - Click
Generate New Tokenand selectwhatsapp_business_messagingandwhatsapp_business_managementpermission. - Copy and save your token.
Fix for Unexpected Messaging Behavior
Experiencing replies from the wrong numbers? Disable the advanced permission for
whatsapp_business_management. This adjustment is crucial because advanced permissions can interfere with how messages are routed, leading to responses from multiple numbers instead of the intended one. Reverting to basic permission settings ensures messages are directed correctly, solving this issue.
Finalizing Channel Configuration
The next step is to Enable the channel from the top of the screen and then copy the webhook URL from the button below the webhook URL.
In the last step, click Save.
Now we can go back to Step (3) & Step (4) in this article.
Webhook Fields
We need to subscribe to the webhook fields below
- Messages: For the chat to work properly, you need to subscribe to the messages webhook field.
Content Types Mapping
From Botpress to WhatsApp
- Text is mapped to Text Object
- Text with Markdown is mapped to Text Object
- Image is mapped to Media Image Object
- Audio is mapped to Media Audio Object
- Video is mapped to Media Video Object
- File is mapped to Media File Object
- Location is mapped to Location Object
Special behaviors to consider
Choices (buttons), dropdowns, cards, and carousels are all mapped to Interactive List Objects.
This comes with a few restrictions and behaviors specific to WhatsApp:
Choices (buttons) and Dropdowns
- When there are 3 or fewer choices as buttons or in a dropdown, they will be rendered as buttons.
- When there are more than 3 choices as buttons or in a dropdown, they will be rendered as a dropdown.
- If there are more than 10 choices in a dropdown, the multiple dropdown messages will be sent with up to 10 choices in each messsage.
- For example, if your bot has a dropdown with 10 choices, the user will receive two messages: the first message will have a dropdown with 10 choices, and the second messge will have a dropdown with two choices.
- Each dropdown requires a label but the Studio currently doesn’t support specifying one, so the label “Choose…” is used for all dropdowns by default.
- Button labels are limited to 20 characters, and dropdown labels are limited to 24 characters.
- Labels exceeding these limits are automatically truncated. For example, the label "This button label is very long" would become "This button label i…" on a button and "This button label is ve…" on a dropdown.
Cards and Carousels
- WhatsApp only supports one link (label and URL) on a card, so multiple links will be split into separate empty cards.
- WhatsApp imposes a limit of 3 "reply" action buttons on a card, so if a card has more than these, the buttons will be split into multiple cards.
- WhatsApp doesn't natively support carousels, so each card in a carousel will be sent individually.
Files
- When files are sent over Whatsapp, the Studio doesn't store the original filename (for security reasons) but only the file extension, so the file will be sent with a generic filename ("file") followed by the extension of the file. For example, if you send a PNG file, it will be sent as "file.png".
From WhatsApp to Botpress
Text
Text messages are directly mapped to Botpress text messages, and readable through event.preview.
Location
Use a “Wait for User Input” card on your bot, check that event.type equals "location", and then read event.payload which will contain the following properties:
latitudelongitudeaddress(not always provided)title(not always provided)
Media (images, audio, documents)
Use a “Wait for User Input” card on your bot, check that event.type equals "image", "audio" or "document", and then read event.payload which will have the following structure depending on the event type:
- For an image:
{"imageUrl": "https://lookaside.fbsbx.com/...."} - For audio:
{"audioUrl": "https://lookaside.fbsbx.com/...."} - For a document:
{"documentUrl": "https://lookaside.fbsbx.com/....", "filename": "the-filename.pdf"}
Then, you can retrieve the raw file content from WhatsApp by making a GET HTTP request to the URL provided in the payload while passing your WhatsApp access token as a Bearer token in the Authorization HTTP header.
For example:
/* INSTRUCTIONS:
1. Create a Configuration Variable named "WHATSAPP_ACCESS_TOKEN" in the Bot Settings section of Botpress Studio.
2. Go to the "Configuration Variables" section of your bot in Botpress Cloud and set its value to your WhatsApp access token.
*/
const whatsappAccessToken = env.WHATSAPP_ACCESS_TOKEN

const res = await axios.get(event.payload.imageUrl, {
  headers: {
    Authorization: `Bearer ${whatsappAccessToken}`,
  },
})

// This will be a JavaScript Buffer (https://nodejs.org/api/buffer.html) containing the raw binary content of the media file.
const rawFileContent = res.data

// This will indicate the file type, see:
// https://developers.facebook.com/docs/whatsapp/cloud-api/reference/media/#supported-media-types
const mimeType = res.headers['content-type']
For further information, please check the WhatsApp documentation on downloading media files and the Botpress documentation on using Configuration Variables.
Other message types
- Buttons and interactive replies from a list or button are mapped to a plain text response from the user, so you can use
event.previewto get the value. - Botpress does not currently support other Whatsapp message types.
Tips
-
To get the phone number of the user you can read the following variable:
{{ event.tags.conversation['whatsapp:userPhone'] }}.This number also contains the country code and has no spaces, dashes or signs.
-
To get the Whatsapp Phone Number ID of your bot that the user is interacting with (useful when pointing multiple Phone Number IDs to the same bot):
{{ event.tags.conversation['whatsapp:phoneNumberId'] }}
Example:
- [Text card]:
Where are you? Please use Whatsapp's "Send Location" feature. - [Wait for Message card]
- [Text card]:
Thank you! You are located at {{event.payload.title}}, {{event.payload.address}} with longitude {{event.payload.longitude}} and latitude {{event.payload.latitude}}.
Starting a Conversation Proactively
As required by WhatsApp, a conversation with a user can be proactively initiated only by using Message Templates, which need to be created in your WhatsApp Manager dashboard first and then reviewed and approved by WhatsApp in order to use them.
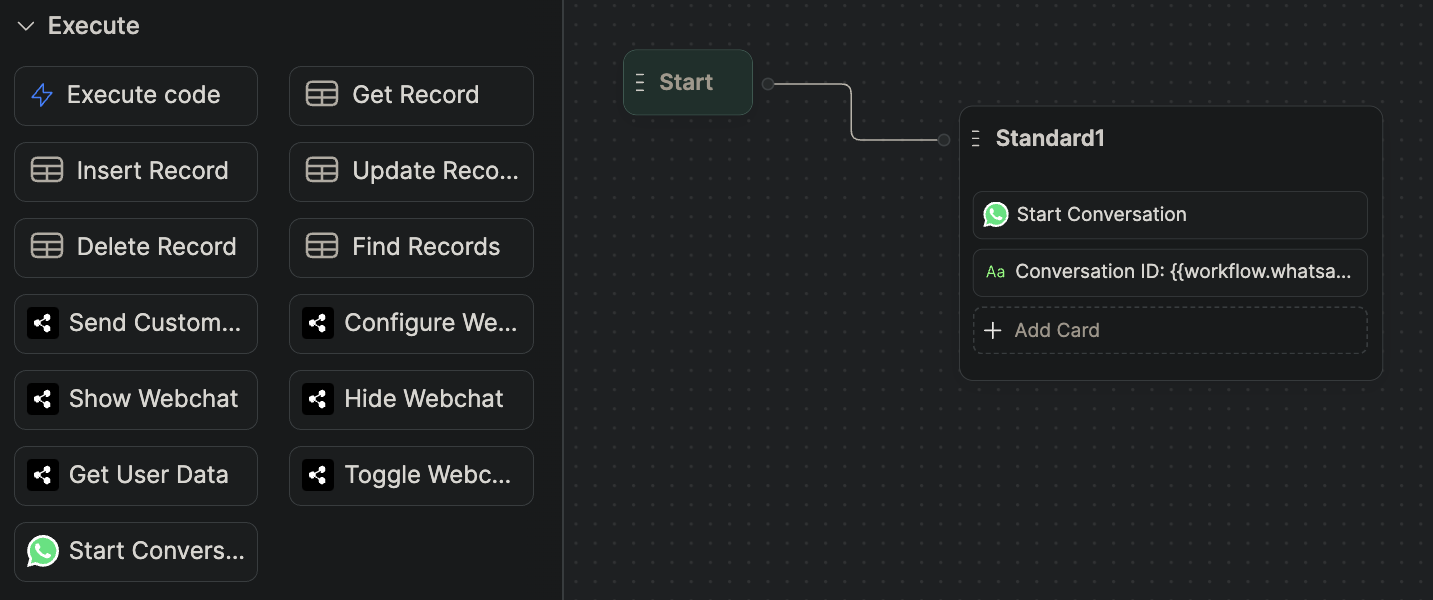
Once you have a message template approved by WhatsApp, it's very easy to have your bot start a conversation with a user by just using the Whatsapp "Start Conversation" card:
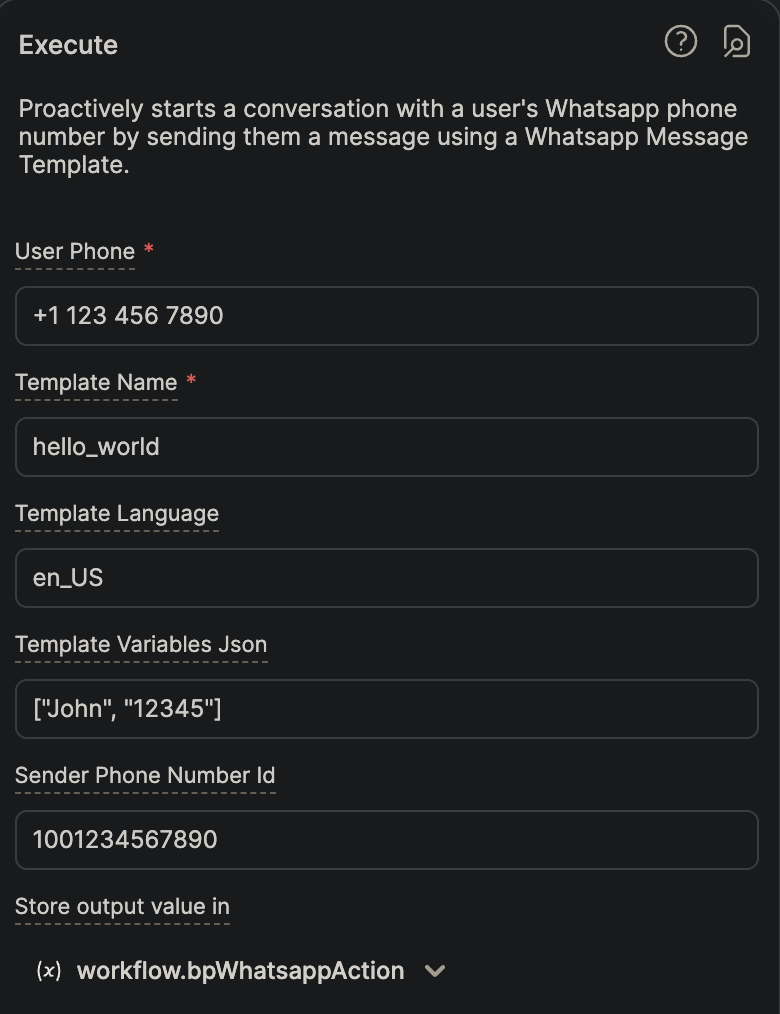
Then you just need to pass the following fields to proactively start a Whatsapp conversation with a user:
- User Phone: The phone number of the user, including the country code (e.g.
+1 123 456 7890). - Template Name: The name of your WhatsApp message template to use for the first message of the conversation. The template should be already approved by WhatsApp in order to use it.
- Template Language (optional): The language code of your WhatsApp message template (see below for more details).
- Template Variables JSON (optional): The values of the variables for your WhatsApp message template, specified as a JSON array representing the list of values (see below for more details).
- Sender Phone Number ID (optional): The Whatsapp Phone Number ID you want to use as sender of the message if you have multiple phone numbers available in your Meta Developers dashboard. If you don't specify this field, the Default Phone Number ID specified in the Whatsapp configuration of your bot in your Botpress Cloud dashboard will be used by default.
Once the conversation is created, if the user replies back it will be processed by your bot as a normal incoming message, so nothing else needs to be done.
Template Language
If the language you selected for your template in the Whatsapp Manager dashboard has a country qualifier, then the value for "Template Language" needs to be specified in the language_COUNTRY format where language is the 2-letter lowercase ISO code for the language, and COUNTRY is the 2-letter uppercase ISO code for the country. On the other hand, if the language in Whatsapp Manager doesn't specify a country then you can enter just the 2-letter lowercase ISO code for the language.
For example:
- If you selected the "English (US)" option for the language of your Message Template in Whatsapp Manager, then the value you need to enter for "Template Language" in Botpress is
en_US. - If you selected the "English (UK)" option, then the value you need to enter is
en_GB. - If you selected the "French" option, which doesn't have a country qualifier, then the value you need to enter is just
fr.
Template Variables
Template variables need to be passed as a JSON array of string or numeric values representing the list of variable values, as Whatsapp only allows referring to them by their position in your message template (e.g. {{1}} for the first variable, {{2}} for the second variable, and so on).
For example, if your Message Template expects a first variable (referred to as {{1}} in the template) with the person's first name and then a second variable ({{2}} in the template) with an account number, then you would pass the following JSON array as the value for the "Template Variables" field:
["John", "12345"]
Accessing the Botpress Conversation ID
If you need to access the ID of the conversation created in Botpress Cloud by this action, you can choose to store the output value of this action in a variable. The output value of this action will be an object with the following structure:
{
  conversationId: 'ffa09762-6c37-4ebd-a82f-307048929c97'
}
So for example, if you choose to store the output value of this action in a variable named bpWhatsappAction, you can use {{ workflow.bpWhatsappAction.conversationId }} in input fields of the Studio (where supported) to insert the conversation ID, or use workflow.bpWhatsappAction.conversationId to access it in code.
Creating the conversation using the Botpress Client
Note: This only works for bots created from code only.
If you're building a bot as code (instead of using Botpress Studio), you can use the Botpress Client instance provided to your bot's handlers to call this action programmatically as shown in the following example:
const result = await client.callAction({
  type: 'whatsapp:startConversation',
  input: {
    userPhone: '+1 123 456 7890', // The full phone number of the Whatsapp user you want to initiate the conversation with.
    templateName: 'test_message', // This is the name (identifier) of your WhatsApp message template.
    templateLanguage: 'en_US', // Optional (defaults to `en_US`)
    templateVariablesJson: JSON.stringify(['John', '12345']), // Optional (only needed if your message template uses variables)
  },
})

console.log('Botpress conversation ID: ' + result.conversationId)
Updated about 12 hours ago